
frnkeore
Member
I was asked to describe how I fixed my out of round mold. Here goes............
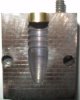
I bought this mold off Ebay for my 33 caliber rifle. When I received it and cast some bullets, I found that they where 4 to 5 thousands out of round, way to much! I took them to the range a fired a 100 yard group to see if they might have promise and got a 3/4 group so, I thought it would be worth working on.
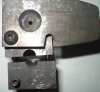
First I examined it and found that it was done in a 4 jaw chuck but, the blocks weren't parallel to each other by about the same amount (.005), shown exagrated in picture four. So, when the jaws were tighten it pushed the pins over, even though it was clamped together.
I made a brass button to fit in the base band of the mold and placed the block on top of each other and clamped them in my Kirk vise. Here you need to be sure that the block are the same distance, top to bottom, or one block will be loose and able to wobble when worked on. A little machinist trick you can use if one is .0005 shorter, is to put a piece of paper at the bottom to take up the difference and hold both block fairly evenly.
The top of the block must go against the solid jaw, to keep the bullet base parallel, the button must be no more than .0002 smaller or larger than what the base band was machined to. What I do to determine that is, with the mold pins out, I use gage pins in the base band, until one fits tight, w/o clearance between the blocks.
These were Lyman blocks with 5/32 pins and with the two blocks in the vise, tapped gently together, I indicated the pin hole and drill through both blocks, .010 (#16) undersize for a 3/16 undersize (.001) dowel pin reamer and move over to the other pin hole and do the same.
At this point, take them out of the vise and ream the off side with a 3/16 or 1/4" reamer. You might want to reamer at least 1/2 of the dowel pin side the same, from the back side so, the pin isn't to hard to press in.
I bought some 3/16 SS dowel pins, rounded one end and pushed the pins in until they just fit w/o clearance in the opposing side.
The bullets out of this mold now mic round
Part II
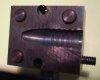
I did that over 3 years ago and over the next two years, those pins loosen, because the one was on the edge, as you can see. So, last year, I pushed the 3/16 pins out and put the same brass plug in the base band and made three more pin holes, this time 1/4" dowel pins have been used and I don't expect any more shifting, EVER!
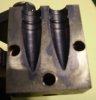
Before I did this mold, I fixed a DC 320366 but, this time, I had another SC 323366 mold. Fortunately they cast with in .001 of each other. I filled both cavity's and putting it in a vise, I also used a finger clamp to hold it down. I then open the 5/32 holes, as above but, I put a third 3/16 pin in between the cavity's. I could have fixed it just like the 33 mold, using two but, I hadn't thought of the brass plugs yet.
Frank
I bought this mold off Ebay for my 33 caliber rifle. When I received it and cast some bullets, I found that they where 4 to 5 thousands out of round, way to much! I took them to the range a fired a 100 yard group to see if they might have promise and got a 3/4 group so, I thought it would be worth working on.
First I examined it and found that it was done in a 4 jaw chuck but, the blocks weren't parallel to each other by about the same amount (.005), shown exagrated in picture four. So, when the jaws were tighten it pushed the pins over, even though it was clamped together.
I made a brass button to fit in the base band of the mold and placed the block on top of each other and clamped them in my Kirk vise. Here you need to be sure that the block are the same distance, top to bottom, or one block will be loose and able to wobble when worked on. A little machinist trick you can use if one is .0005 shorter, is to put a piece of paper at the bottom to take up the difference and hold both block fairly evenly.
The top of the block must go against the solid jaw, to keep the bullet base parallel, the button must be no more than .0002 smaller or larger than what the base band was machined to. What I do to determine that is, with the mold pins out, I use gage pins in the base band, until one fits tight, w/o clearance between the blocks.
These were Lyman blocks with 5/32 pins and with the two blocks in the vise, tapped gently together, I indicated the pin hole and drill through both blocks, .010 (#16) undersize for a 3/16 undersize (.001) dowel pin reamer and move over to the other pin hole and do the same.
At this point, take them out of the vise and ream the off side with a 3/16 or 1/4" reamer. You might want to reamer at least 1/2 of the dowel pin side the same, from the back side so, the pin isn't to hard to press in.
I bought some 3/16 SS dowel pins, rounded one end and pushed the pins in until they just fit w/o clearance in the opposing side.
The bullets out of this mold now mic round
Part II
I did that over 3 years ago and over the next two years, those pins loosen, because the one was on the edge, as you can see. So, last year, I pushed the 3/16 pins out and put the same brass plug in the base band and made three more pin holes, this time 1/4" dowel pins have been used and I don't expect any more shifting, EVER!
Before I did this mold, I fixed a DC 320366 but, this time, I had another SC 323366 mold. Fortunately they cast with in .001 of each other. I filled both cavity's and putting it in a vise, I also used a finger clamp to hold it down. I then open the 5/32 holes, as above but, I put a third 3/16 pin in between the cavity's. I could have fixed it just like the 33 mold, using two but, I hadn't thought of the brass plugs yet.
Frank
Attachments
Last edited: