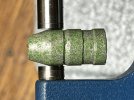
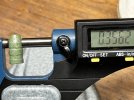
Found a wanted Mold today!

CWLONGSHOT

Well-Known Member
I thought it a few years ago.. But it was 2013 I was gifted some Saeco 353 bullets.
I really like the shape! I started looking for my own. I missed a couple on forums and passed on a few too costly.
Tommy boy lent me a couple molds some time back and one was somewhat similar to this 353 only gas checked.
Last week I found one on eBay. I watched it all week and it crept up a lil every few days. It was approaching my predetermined max $$.
Then Yesterday, I realized it came with Saeco handles... The add is written and no pics show both mold and handles. I always consider a fraud possibility. We all know some people suk and time will tell what arrives. But apparently the others was snoozing at close. I was able to get it for less then I initially decided as max bit BEFORE I REALIZED it came with handles!
Mold looks/appears very lightly used and or VERY well cared for.
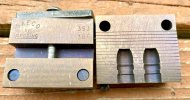
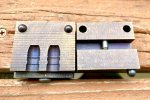
E83F7035-E87A-483F-B87D-4D14B1A5BEDF.jpegA8A0183F-701C-4E13-A643-930E518BEC43.jpeg

I see some blues, telling of overheat. Hoping nothings warped.. Comes in factory box too.

CW
 
Last edited:

farmboy

cookie man
I was watching that mold for awhile but didn't bid but instead bought a Saeco 396 from the same seller. I hope to use it in a 35 Remington.
 

Rick

Moderator
Staff member
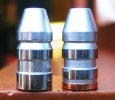
For those curious about this SAECO bullet. #396 on the left, 399 on the right.

Left-SAECO 396 Right-SAECO 399-9.JPG

This a two-diameter bullet. These bullets were both sized, notice the front band not touched at all. Possibly work well in a rifle but these are the two worst bullets I've ever tried in a revolver. The front band doesn't hold the cartridge concentric in the throat leaving it laying on an angle. The middle band then strikes the entrance to the throat and shaves lead. The cylinder leads, keep shooting and it spreads to the forcing cone and then down the barrel.
 

farmboy

cookie man
I have a friend that used to shoot the 399 in a S&W 357 in "silly wet" matches and claimes it shot very well for him. At least accuracy wise but I don't know about leading the barrel.
 

Rick

Moderator
Staff member
That was my intended use for them, only time I have ever leaded up a Freedom Arms revolver.
 

CWLONGSHOT

Well-Known Member
For those curious about this SAECO bullet. #396 on the left, 399 on the right.

View attachment 26877

This a two-diameter bullet. These bullets were both sized, notice the front band not touched at all. Possibly work well in a rifle but these are the two worst bullets I've ever tried in a revolver. The front band doesn't hold the cartridge concentric in the throat leaving it laying on an angle. The middle band then strikes the entrance to the throat and shaves lead. The cylinder leads, keep shooting and it spreads to the forcing cone and then down the barrel.
Ric.
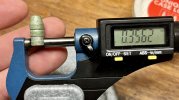
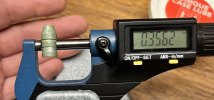
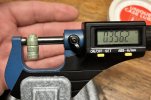
I assume there have been different molds from Saeco, with same numbers. My 396, is a older mold and does not exhibit this issue when sized to .9763598C-9882-47FA-8B0C-254F41B5C8E7.jpegBD7A2167-EC73-4D2F-B026-F4142F2F406E.jpegD9B1ADA0-1961-4CF3-A061-147700FB308D.jpegDE32F81B-96AA-40AF-834E-E1E3F236C58F.jpeg3A70FCBC-0F85-4D3B-B90D-5521A57023E7.jpeg356 as I have been using it (mostly)
 

Rick

Moderator
Staff member
The ones in the picture were sized .357" for a mild snug fit in the FA throats. As you can see the front band was a long way from being touched. My molds are about 30 years old give or take. Did they change the design? Dunno but if they did it was a wise move.
 

farmboy

cookie man
My friend has gifted a hand-full of the 396 bullets. So I went and found a few and they look like Rick's photo's. Don't want to go down the steps to the shop to get my tools to measure the bullets. Having a "dizzy spell" day and don't to fall down the steps. Will post the measurements tomorrow. But I feel safe using these bullets in a rifle with a tube magazine as I have talked to several hunters who use them frequently with no problems.
 

358156 hp

At large, whereabouts unknown.
As far as the mould being overheated, the cavities simply look like there may have been oil in them at some point. I buy and sell a lot of moulds and generally clean them before listing for sale. Often times I oil "blue" the mould at the end. This is done by oiling the mould lightly, then setting it on a small tin tray that I float on top of one of my pots with the alloy at 725*, my normal casting temp. The mould will turn a nice blue after a few minutes, and has never been overheated. This is very similar to the process Hensley & Gibbs used to leave their moulds that nice straw-colored hue. They would heat the moulds until hot, then quench them in light oil according to some sources, and then set them aside to cool before final assembly and packaging.
 

CWLONGSHOT

Well-Known Member
As far as the mould being overheated, the cavities simply look like there may have been oil in them at some point. I buy and sell a lot of moulds and generally clean them before listing for sale. Often times I oil "blue" the mould at the end. This is done by oiling the mould lightly, then setting it on a small tin tray that I float on top of one of my pots with the alloy at 725*, my normal casting temp. The mould will turn a nice blue after a few minutes, and has never been overheated. This is very similar to the process Hensley & Gibbs used to leave their moulds that nice straw-colored hue. They would heat the moulds until hot, then quench them in light oil according to some sources, and then set them aside to cool before final assembly and packaging.
♥️♥️♥️
 

farmboy

cookie man
Just watched your video...looks like you got a winner! In the video you mentioned a trick on how to vent a mold. Do you have a video on Parlor for that, or on YouTube? I'm not new to casting but never felt comfortable "sawing away" at a mold. Don't want to cause damage to an otherwise good mold.
 

CWLONGSHOT

Well-Known Member
Just watched your video...looks like you got a winner! In the video you mentioned a trick on how to vent a mold. Do you have a video on Parlor for that, or on YouTube? I'm not new to casting but never felt comfortable "sawing away" at a mold. Don't want to cause damage to an otherwise good mold.
Thank you!! ♥️♥️ I know that I did on uTube before I was deleted. Let me check. I believe I did a second vid.

Bacically what you do is disassemble mold. Holding top edge at about 45° and using a sharpening stone polish off that corner. All ya need is a thousands or so, because ta do both sides and the amount is doubled.
When ya re assemble, you can just see and get a finger nail in the enlarged seam between mold halves. This creates venting for air under spure plate making better fill
Out with out such a huge puddle needed. Ya still want a puddle proper mold fillout but some molds are tempermental here and this venting has always eliminated that for me.

CW