My First Project (kinda)

Gary

SE Kansas
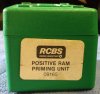
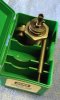
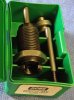
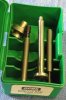
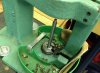
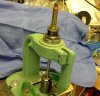
So, I bought a RCBS Positive Ram Priming Unit to use with my T-7 as well as my 2 Rock Chuck'rs. Impressed with the unit but a light bulb came on; what if I had a long rod with a milled end to work as a primer pocket swager? I set about designing and came up with a simple solution. I used the mini lathe along with a piece of scrap 3/4" bar and fashioned the "swager". Darn thing works!! Since I only had need for a swager for my small pocket primer brass I only made the one. The way it works is that the swager rod is cut to fit in the Ram of the press(s) and the Priming Unit body in inserted in the die holding insert and plunked into the press.
These pics will explain it better than I can.
 

Attachments

  • rcbs swager6.jpg
    rcbs swager6.jpg
    506.8 KB · Views: 21
  • rcbs swager4.jpg
    rcbs swager4.jpg
    574.4 KB · Views: 21
  • rcbs swager5.jpg
    rcbs swager5.jpg
    462.6 KB · Views: 22
  • rcbs swager3.jpg
    rcbs swager3.jpg
    417.6 KB · Views: 23
  • rcbs swager2.jpg
    rcbs swager2.jpg
    1.4 MB · Views: 22
  • rcbs swager.jpg
    rcbs swager.jpg
    1.3 MB · Views: 25

Brad

Benevolent Overlord and site owner
Staff member
Know that is a neat idea. Far easier than most of the contraptions I have seen for removing primer pocket crimps.
 

Ian

Notorious member
That took a pass or two, didn't it? Did you use the leadscrew to feed the carriage? I have yet to actually do that, usually due to having the change gears set up for something I'll be using next and not wanting to be driving out and in those pesky keys and gear hubs to go back to power-feed ratio.

You have a good idea there, just be careful not to bend the case rims, the commercial pocket swaging setups have a back-up anvil for a reason.
 

RicinYakima

High Steppes of Eastern Washington
A hint is to use Imperial sizing die wax on the forming part once in a while. Then it slides in rather than brute force.
 
  • Like
Reactions: Ian

Gary

SE Kansas
Well, actually I dressed the "tip" with my file to clean it up a little and unintentionally made a slight bevel so it enters the primer pocket with the slightest little bit of resistance.
 

Brad

Benevolent Overlord and site owner
Staff member
What kind of steel? That is a great place for O1 and a torch to harden after wood polishing.

The lubrication is a good idea too.
 

Gary

SE Kansas
I don't have a clue what steel; I'll ask the machinist I got it from,(his junk pile) if he knows. I also got some 1/2" bar that I'll be using instead of the 3/4". It seemed to take for ever to get it to size.
 

Brad

Benevolent Overlord and site owner
Staff member
Did you use a center? Turning something that skinny and long is asking for deflection.

Most important, did you have fun and learn from it?
 

Gary

SE Kansas
I didn't use a center, but what I did was turn down the base and about half the shaft then turned the piece around and turned the rest of the shaft and the tip. Didn't seem to have much of a problem with the bar staying centered in the chuck (although I didn't indicate it either). What's important to me is that it works and the amount of pressure needed to swage the primer pocket is almost non existant since only the rim is being staked rim is being worked.
Ya'll think I should attempt to temper the tip? BTW, I did learn a few things for later reference AND it was a fun project.
 

Pistolero

Well-Known Member
Good idea, this basically duplicates the old C&H primer swaging system. It worked fine on
some brass, but I found that the hard to swage brass wound up with damaged rims. Only
some kinds of brass had this problem, but it was enough of an issue that I switched to
the RCBS system which supports the case with an internal rod, unloading the rim.

Hope you have better results than I did.

Bill
 

Gary

SE Kansas
So far Bill, it's been easy peasy. I only plan on swaging the 5.56/.223 brass and only the staked part of the base.