
Gary
SE Kansas
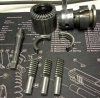
The Chuck wouldn't open or close without considerable effort, so I decided to try fixing it. I watched a utube video by Tubalcain and said to myself, "I can do that".
I messed up by not taking a before pic, but I was to excited just finding the dadblamed thing. So I
commenced to give it a 5 hour bath in White Vinegar. Never done that before, but it worked really well in removing the rust. Stripped the chuck down following the video instructions and it was gunked up and rusted in places. Following the bath and sodium bicarb rinse I flushed everything with WD40. Then the process of wiping the parts down and to my amazement all the rust was removed but staining remained. Some buffing and lots of the staining was removed as well.
FYI, if you ever do this little job, pay very close attention as to which jaw is #1, #2, and #3; you'll have real trouble if you don't. The slots where the jaws reside are clearly marked as to 1,2,3, but as I discovered, the Jaws aren't. I finally stumbled upon mill marks on the backside of the jaws; one was a long mill mark; two was a little shorter and #3 was the shortest mill mark. Only took me a little over an hour to discover the marks. I did do a photo array of the reassembly but I won't post that unless anyone is interested. Great way to spend an afternoon in the shop.
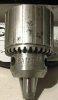
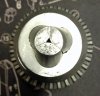
She spins open and closes nicely but I'm pretty sure it needs a kit. Going to use it first to see how it goes.
I messed up by not taking a before pic, but I was to excited just finding the dadblamed thing. So I
commenced to give it a 5 hour bath in White Vinegar. Never done that before, but it worked really well in removing the rust. Stripped the chuck down following the video instructions and it was gunked up and rusted in places. Following the bath and sodium bicarb rinse I flushed everything with WD40. Then the process of wiping the parts down and to my amazement all the rust was removed but staining remained. Some buffing and lots of the staining was removed as well.
FYI, if you ever do this little job, pay very close attention as to which jaw is #1, #2, and #3; you'll have real trouble if you don't. The slots where the jaws reside are clearly marked as to 1,2,3, but as I discovered, the Jaws aren't. I finally stumbled upon mill marks on the backside of the jaws; one was a long mill mark; two was a little shorter and #3 was the shortest mill mark. Only took me a little over an hour to discover the marks. I did do a photo array of the reassembly but I won't post that unless anyone is interested. Great way to spend an afternoon in the shop.
She spins open and closes nicely but I'm pretty sure it needs a kit. Going to use it first to see how it goes.
")