Is there

Tomme boy

Well-Known Member
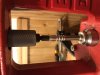
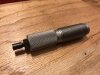
I was thinking about sizing gas checked bullets base first in a Lee Die. Some bullets you can not do this because they are pointed. I was thinking about the cup nose top punch from Keith. Use the Lee die but have the pusher stem made so it would take Keith's top punches or other punches so you could seat and crimp gas checks base first.

I know the top punch would have to be the same diameter as the die you are sizing for so you would need multiple ones for different cal. Or just make a universal one in each cal with a blank hole so you could fill with epoxy for the bullet you are using. Then insert it just like the stem that Lee has in your press.

Anyone want to make me one for 9mm diameter? I could drill a hole in the stems I have but they would not be anywhere near center. And that is a must.
 

Brad

Benevolent Overlord and site owner
Staff member
Would not be that hard to make a push rod with a cavity for the nose to sit in. Just use some exposure for the final fitting. Would likely be easier to make multiple full pushers than a bunch of removable parts on a single pusher.
You could go a different route in ways and make a pusher base then multiple rods that thread into that base. The base would be cut to fit in the press ram.

Let me think in this a bit.

Any reason to not just size nose first?
 

Matt

Active Member
If you’ve got an RCBS press mounted priming system the shell holder is formed to hold a truncated cone shaped receptacle to hold the primer seating rod. It fits my 312 -185 Lee bullets fairly closely, so it would work for a lot of bullets with that nose form. I’m curious about why you want to go base first and haven’t put this Rube Goldberg thought to the test to see if it would work. Provably too short. Maybe I’ll go check after breakfast.
 

Joshua

Taco Aficionado/Salish Sea Pirate/Part-Time Dragon
I press my checks on with my seating die.

Step one: remove seating stem from die

Step two: thread it in backwards so that it is sticking out the top of your die

Step three: install die in your press the wrong way

Step four: use the push rod from your lee sizer to press on your check

Step five: (optional) form a dot of hot glue into the stem cavity for a perfect fit

Josh
 

Attachments

  • 5CF17C67-769B-4300-92D4-CB131F6B62E0.jpeg
    5CF17C67-769B-4300-92D4-CB131F6B62E0.jpeg
    82.6 KB · Views: 21
  • 143F8B2E-D3CF-4250-9446-09432FDC71D8.jpeg
    143F8B2E-D3CF-4250-9446-09432FDC71D8.jpeg
    121.3 KB · Views: 20

Brad

Benevolent Overlord and site owner
Staff member
Could even eliminate the threads. Bore a flat bottom hole in base piece, add a set screw from side, and simply make rod end fit bored hole and hold in place with set screw. With the fact there really isn’t any force being added to pull the rod out of the hole this would work fine. Eliminating threads from rod means rods are far faster and easier to make.
 

Ian

Notorious member
Gas checks applied base first in a Lee push-through die tend to migrate away from the base as they are crimped. I always use the Lyman gas check seater to firmly seat and partially crimp the checks on the shanks before running them through the Lee sizer the normal direction. Also, if you run the bullets through base-first there is a tendency for them to go in crooked and have a wobbly nose.
 

Tomme boy

Well-Known Member
When I seat my checks now I use a 1/4" flat steel bar that I put under the size die and push the bullet up to seat the check against the bar. Works perfect. Then send them through the die.

@Brad that was exactly what I was thinking. The only problem I see is the top punch would have to be longer and no shoulder on it. So it pushes the bullet past the sizing ring inside the die. Otherwise you might be trying to size 2 bullets at the same time.

I see that NOE does make an adapter to use the top punches. I wonder if that would work on the APP press as the sizing die is a lot shallower than the old sizing dies. I think I am just going to order it and see.
 

Brad

Benevolent Overlord and site owner
Staff member
The length of the rod is a simple change. I tend to make mine long enough to get past the sizing section with each bullet. Since I am also making my one sizers I can easily make that happen.
 

Tomme boy

Well-Known Member
@Brad send me a PM with info. I think the nose could be left hollow to fill with epoxy like you said. I need it to go into a 0.355" sizer
 

Spindrift

Well-Known Member
Gas checks applied base first in a Lee push-through die tend to migrate away from the base as they are crimped.
I agree, they appear slightly domed. But after powder coating, I size them to final size nose-first, and they turn out quite nice.
I use a lot of home made GC, sometimes quite thin materials. I have found this process to yield the best results with these checks, since I avoid finning at the base. I’m not saying it is «The Method», only that it’s what seems to work best for me, with the tools at my disposal.

With commercial copper checks, I’m not sure it matters much.
 

wquiles

Well-Known Member
I love this site/forum - so much knowledge, and people so willing to share/help.

You know what I already have learned from this thread? That I have not cared "enough" or much at all when seating the gas checks for many years now!. Starting to wonder how much of my groups or "fliers" is simply due to not taking enough care on this critical step. So far I install gas checks when sizing on the Lee push through sizing die - same stroke used for sizing also does seat (and crimps) the gas check. I need to review what I do and might consider the NOE gas check seating die if/when in stock, or simply make my own.

Gas Check Seating Die
 

Ian

Notorious member
I think Brad is the one who came up with that idea and made the first one, I'm sure he'd be willing to share some insight for making one.

I learned a lot over the years by examining and shooting other people's cast bullets.
 

waco

Springfield, Oregon
Brad sent me one of his prototype gas check flaring tool a couple years ago. It works REALLY well to get checks seated squarely. This was a 30cal. I have since purchased several more from NOE. Brads fit and finish is much better than the NOE stuff if I do say so myself.
 

Rick

Moderator
Staff member
I love this site/forum - so much knowledge, and people so willing to share/help.

You know what I already have learned from this thread? That I have not cared "enough" or much at all when seating the gas checks for many years now!. Starting to wonder how much of my groups or "fliers" is simply due to not taking enough care on this critical step. So far I install gas checks when sizing on the Lee push through sizing die - same stroke used for sizing also does seat (and crimps) the gas check. I need to review what I do and might consider the NOE gas check seating die if/when in stock, or simply make my own.

Gas Check Seating Die

I wrote this on crooked checks back in Nov. 16, you may find it interesting.

As Ian's excellent graphic shows, if the bullet is allowed to enter the rifling canted that is how it will travel the length of the bore and how it will exit the muzzle. Not good for exterior ballistics but just as bad or worse is the bullet base not perfectly square to the centerline of the bore. Just as in a gas check not installed square or a bullet base not completely filled around the entire circumference of the bullet base. imagine high speed photography and freeze frame photo's, imagine a photo of the very instant the bullet base exits the muzzle. In that photo a canted bullet or a crooked gas check and one side of the bullet base is still in contact with barrel crown on one side of the bullet base. The other side of the base is now in free flight and there is still pressure behind the bullet pushing. The pressure will in that micro second push the bullet off slightly to one side because of the side that's still contacting the crown. The result is shot dispersion on the target. That's why crown's need to be perfect and bullet bases need to be perfectly square to the centerline of the bore.

All of this may be new to you but it is the reason the bullet needs to be started straight, enter the rifling straight and exit the crown square to the bore center line. For exterior ballistics if the bullet cants while exiting the case mouth and enters the throat and rifling at an angle it will be misshapen creating a non concentric object in flight. The result is shot dispersion on target. The last several pages have been to teach how important it is to start the bullet straight and how to achieve the straightest start possible. This may be contrary to what you been told before but if you'll heed the advice given here, experiment and practice you will have a serious consequence you'll have to live with . . . You will have to live with better groups. I think you'll be able to adjust and get used to it.

Perfect bullet bases and as straight a start as possible. Simple huh?
 

Rick

Moderator
Staff member
Brad sent me one of his prototype gas check flaring tool a couple years ago. It works REALLY well to get checks seated squarely. This was a 30cal. I have since purchased several more from NOE. Brads fit and finish is much better than the NOE stuff if I do say so myself.

Al used Brad's check sizer as his prototype. Brad used my check sizer for his inspiration and actually made a big improvement in it by simply reversing the set up. The idea is simply that checks that fit properly are flat against the base of the bullet and square to the center line of the bullet and bore.
 

Joshua

Taco Aficionado/Salish Sea Pirate/Part-Time Dragon
I found that the pointy nosed NOE 325365 needs to have the checks pre-seated, and then this bullet sizes nose first fine. I size these 8mm bullets all the way down to .318” in one stroke. Without the extra step of preseating I was having a 50% failure rate. I wasn’t prepared to give up on this mold. I read about the NOE check seating tooling. That was my inspiration for using a bullet seating die to seat checks.

The Lee 324-175-1R taught me so much about casting and sizing and checks. It had an oversized tapered gas check shank. It kicked checks like a wild mustang kicking off horse shoes! I tried the nose first method. I tried the base first method. Nothing seemed to work. I tried annealing checks. I tried a homemade check expanding punch. I destroyed most of the first two batches I cast with that mold. I tried everything I could think of and I read and read. I finally gave up on this mold and drilled out the shanks to make it a plain base mold. A pretty good education for only $25.00!

Josh