Lyman Block Repair

Rick

Moderator
Staff member
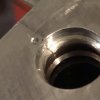
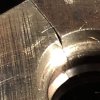
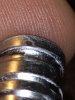
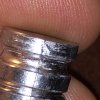
Looks much like this SAECO #382 with the chip on the nose. Don't know how that happened but I've always assumed it was a flaw in the bar stock the mold was cut from and that piece eventually flaked off. It's never gotten any worse and oddly it doesn't show up on the nose of the bullet so I just haven't worried much about it. I've also got another SAECO with a similar "chip" on the lower drive band that actually a little worse than this one but I couldn't find a picture of that one. It also doesn't show up on the bullet.

382 chipped mold-9.jpg
 

Pistolero

Well-Known Member
A tiny dab of braze alloy will stick, bu tthe recutting would be a PITA because it will flow
out farther than you want.

I agree with those who suggest peening it out and touching up with a file. Go on the closing face and
with a prick punch, not center punch, just about 1/16th or so away, put down a row of two or three
pricks, see if that will move enough metal to let you file it back. Dents in the closing face hurt
nothing if you will dress them down to make sure they are not humps. Angle the prick punch towards
the direction you want to move the metal, too.

Not so different than stretching a hand on a revolver to reset the timing.

Bill
 
Last edited:

Bret4207

At the casting bench in the sky. RIP Bret.
Maybe my eyes are off, but thats a lot of chip to fill using the prick punch method and still come away with flat surfaces. Maybe it would work. Only one way to know.
 
Last edited:

CZ93X62

Official forum enigma
I have a one-cylinder #454424 Ideal much like this one, minus the chip. It is far too useful to part with. Were it mine, I would cast with it as-is and use the .454 H&I die in the 4500 to dress off any base protrusion on the bullet--probably via a nose-first pass prior to actual sizing & lubing. Of course, I'm not above sizing bore rider noses, either.
 

Brad

Benevolent Overlord and site owner
Staff member
Looks like the block hit something hard and it caused metal to push into the cavity a bit. There may well be metal missing as the “chip” does have the appearance of broken metal.

Need to think on this one.
 
F

freebullet

Guest
With no guarantee, I will touch a smidge of weld on it for you. You can mill it back to shape. I dunno
 

Brad

Benevolent Overlord and site owner
Staff member
First thing I see a need for is some magnification.
 

Brad

Benevolent Overlord and site owner
Staff member
Did you ever try casting with it in the current condition? That will likely be my first real step.
 

fiver

Well-Known Member
if you look down deeper at brad's pics you can see more stuff down there on the lube groove.
I have a feeling that one was from cutting the mold with no lube for a bit.
 

Ian

Notorious member
Right about where that speck of sand sits is where I'd try sinking the point of a sharp punch to move the whole top corner of the block out. First peen the burr back into place, then clamp the blocks tightly in a vise with a snug pin gauge shoved in the base band of the cavity, warm the blocks up a little with a propane torch, and massage that metal into the void.
 
F

freebullet

Guest
That's a solid plan there Ian gave ya. Tried my hand at paintless dent repair quite a bit last summer on one truck, working the metal back, it's shocking what can be done.
 

Brad

Benevolent Overlord and site owner
Staff member
Did a little work today. Used a .454 gauge pin to keep the metal from moving into the cavity.
A few light taps with a sharp punch did the job. I cleaned the inside of the mould with a brass rod and a little 400 grit paper and short, light strokes. I also ran an India stone across the top of the blockers to make sure there was no burr sticking up that would interfere with plate movement.
Once they cool I will get a few photos of the few bullets I cast for a test run. They drop from the mould quite nicely.
 

Attachments

  • F98DB600-0DDD-40FC-91DF-C00523C02C9F.jpeg
    F98DB600-0DDD-40FC-91DF-C00523C02C9F.jpeg
    72.1 KB · Views: 13
  • D1D99DFF-2B9F-4356-A3FC-0339E4A56E2D.jpeg
    D1D99DFF-2B9F-4356-A3FC-0339E4A56E2D.jpeg
    53.7 KB · Views: 13
  • 72701AFD-B1D5-493F-8BF4-DE5659BFEEB6.jpeg
    72701AFD-B1D5-493F-8BF4-DE5659BFEEB6.jpeg
    64.7 KB · Views: 13

Brad

Benevolent Overlord and site owner
Staff member
These are closeups of the fixed area. The small defect in the bullet is far smaller than the little dents the bullets pick up from falling on each other.
 

Attachments

  • 2109F339-7C33-4934-B84A-6DA229010A40.jpeg
    2109F339-7C33-4934-B84A-6DA229010A40.jpeg
    829.7 KB · Views: 12
  • 548E8624-3A2E-4B7A-8EF1-4C9823C1FACC.jpeg
    548E8624-3A2E-4B7A-8EF1-4C9823C1FACC.jpeg
    80.9 KB · Views: 12
  • C5F05A77-6B9D-4E97-9541-31F6DB23DD89.jpeg
    C5F05A77-6B9D-4E97-9541-31F6DB23DD89.jpeg
    81.3 KB · Views: 11

Brad

Benevolent Overlord and site owner
Staff member
Mould closes very nicely. The split line is very minimal on the bullets.
Since this is a 454 mould and not the newer 452 it should clean up very well with sizing.