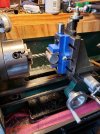
Mini lathe milling attachment

Ian

Notorious member
For $150 total, shipped from India with a double-acting vise included, I couldn't resist. Together with a clamping set and bars, blocks, etc this is 100% better than no mill at all and doesn't take up much space in the shop. The table is 3x5", way better than the 2x3" tool post milling attachments and Z-bar mount
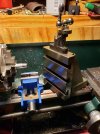
20210302_193504.jpg
 
Last edited:

fiver

Well-Known Member
double acting?
like it clamps in from both directions?

if it does,,,, you know..
 

Ian

Notorious member
Yeah, it does, and I know. There's a bigger one in my wish list that could be bolted on dead-center vertically to a big gusseted 90⁰ angle plate, and have the jaws modified slightly for guide pins.

Main thing is this is medicine for that new rifle fever thing I still got, and nobody makes what I want. (Well, not entirely accurate, Martin Hagn does, but I don't have a spare $19,000 lying around plus the extra time and $$$ to have the action engraved and Doug Turnbull color case harden all the metal. I figure 30-35 large and three years to get it right).
 
Last edited:

Ian

Notorious member
I was adding that in my edit. Mould making is an option but there's a little better setup easily purchased and modified for that purpose. The problem with cutting mould cavities that way is it requires a cherry, and making a good cherry is really tough without the proper tooling.
 

Bret4207

At the casting bench in the sky. RIP Bret.
I have two milling attachments for my small lathe. Just expect rigidity to be an issue. Very light cuts and tiny feed help.
 

462

California's Central Coast Amid The Insanity
I was adding that in my edit. Mould making is an option but there's a little better setup easily purchased and modified for that purpose. The problem with cutting mould cavities that way is it requires a cherry, and making a good cherry is really tough without the proper tooling.
Didn't see the edit.

I remember the mould making tutorial "the perfessor/KeithB" posted, many years ago, and the pictures that showed the milling part of the process, and that caused me to think of you making a mould.

I'm not a machinist, so please excuse my ignorance, but reckon he was using the line boring method with a cutter that resembled a door lock key. Maybe the process requires more sophisticated equipment than that of the hobby machinist.
 

fiver

Well-Known Member
not really.
a cherry is a cherry because the old round ball mold cutting tool looked just like a cherry, only the stem was straight and the cherry was round.
then come the later bullet designs, a much more deliberate and ornate shaping system was needed to make a cherry, but the process was still the same.
then it moved on to using multiple cherry shapes and multiple cuts were used for the final design, after a single center hole was bored, and other methods followed.
 

Ian

Notorious member
The problem with cutting cavities using a double-acting vise is the cherry flutes need to be helical to prevent vibration/chatter at the edge of the cavities. Difficult to cut helical flutes in the home shop.
 

smokeywolf

Well-Known Member
Need an endmill sharpener/grinder.
Rule of thumb, the less rigidity you have, the faster helix you need on your cutter flutes. This applies to endmills and would translate to cherries too I believe.
 
  • Like
Reactions: Ian

Ian

Notorious member
I'm astonished. Two minutes with a chainsaw file to one hole and it literally bolted directly to my compound swivel. Fit right on the pilot, too, very snugly. With the vertical screw most of the way down and the cross slide about 90% of its travel to the rear, the face of the milling "table" is centered with the chuck.

That saves me having to drill and tap my cross slide for stud holes. Drilling and tapping hardened cast steel is no fun.
 

Bret4207

At the casting bench in the sky. RIP Bret.
Every now and again the gods of things mechanical from The Land Of Almost Right smile on you!
 
  • Like
Reactions: Ian

Ian

Notorious member
And more often the twisted bastards stick it to ya. Turns out the vertical attachment is dead-nutz square to the bedways....but the vise base has been ground at a full 5⁰ angle to the jaws.

Anyway, here's a photo of my first try at milling. The biggest challenges right off are getting the end mill indicated to as close to zero TIR as possible (.0005" isn't close enough) and lack of proper T-bolts and clamping tools.

20210307_113948.jpg