Rusty mould

Brad

Benevolent Overlord and site owner
Staff member
I got the rusty 8mm mould from Rally the other day. Got a chance to look at it today.
Not as bad as I expected. Rust doesn't appear to be to the point of deep pitting. Time will tell.
 

Attachments

  • IMG_3127.JPG
    IMG_3127.JPG
    114.3 KB · Views: 21
  • IMG_3128.JPG
    IMG_3128.JPG
    173.9 KB · Views: 22
  • IMG_3129.JPG
    IMG_3129.JPG
    141 KB · Views: 19
  • IMG_3130.JPG
    IMG_3130.JPG
    165.8 KB · Views: 16

Brad

Benevolent Overlord and site owner
Staff member
Handle screws are frozen tight. I used some ATF/acetone but decided that wasn't going to work as well as I would like. The handle screws have the threads at the end and the screws are 1.12 long so the penetrant has a long way to go to get to the threads.
This is a handle screw from another Lyman 4 cav mould for compairison.
IMG_3132.JPG
 

Brad

Benevolent Overlord and site owner
Staff member
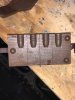
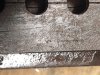
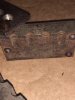
I did a little measuring and the mould is 1.5 tall yet the handle screws are 1.12 long, that leaves .37 of space between top of screw and top of mould block. I decided to drill a small, #38, hole in the top of the blocks centered over the end of the handle screws. This would allow penetrant better access to the threads and I could attack them from both ends.

Turns out the holes in the blocks for the screws are drilled long and there is only about .12 of metal from end of hole to the mould surface.

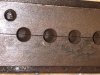
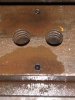
These holes will be under the sprue plate in use so lead won't enter them. I could even drill them a little larger, tap, and put in a screw to be peeled in place then finished flush with mould surface. I will likely just leave them as they won't cause any issues.

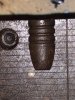
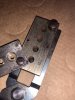
I used a small Allen wrench to help wick the penetrant into the holes and get them well filled. Time will tell how this works out.
 

Attachments

  • IMG_3133.JPG
    IMG_3133.JPG
    148.5 KB · Views: 14
  • IMG_3134.JPG
    IMG_3134.JPG
    131.1 KB · Views: 14

Brad

Benevolent Overlord and site owner
Staff member
At this point I am leaning towards not removing the rust with anything like Evaporust. Much of it is superficial. I can easily use some fine paper and oil on a left over bit of stone countertop to clean the top of the mould and bottom of sprue plate. A light rubbing with 0000 steel wool will clean the mould faces. Cavities can be used to cast a few bullets then those can be used for a light lapping to remove the high spots of the rust.
I want to start with minimal removal techniques first then see what I have.

Going to be an interesting trip.
 

S Mac

Sept. 10, 2021 Steve left us. You are missed.
Looks like a project for sure Brad. I've shared this before, and it's too late for this now but if you will apply water prior to penetrating oil the water penetrates better and the oil will follow the water. An old timer told me that years ago and I practice it often. I turn bolts for a living, lots of farm trucks. Black coffee works well to.
 

Ben

Moderator
Staff member
Brad......I think your strategy is solid and you should be able to pull it off.
I plan to stay tuned to this one.

Ben
 
Last edited:

fiver

Well-Known Member
I'd get those pins out then buy a new plate and bolt for it from midway and cast with it to see what I got.
the pits wouldn't bother me as much now as they would have before powder coat.
 

Brad

Benevolent Overlord and site owner
Staff member
Sprue plate cleaned up pretty well. A little oil and some 400 grit emery removed the surface rust nicely. It still has a distinct patina but I think it will still work fine.
I turned a cone on some brass rod to closely match the angle on the sprue holes. Cut a slot in it and use it to spin some 400 grit emery in the holes. Cleans them up pretty well.

Handle screws are still locked up tight. Those are going to be the biggest challenge.

I will get photos later.
 

Pistolero

Well-Known Member
ATF/solvent is darned near magical. I had to take apart a tractor blade that had lived outside in
coastal southern east coast for 20 years, bolts looked hopeless. A couple of hours soak with ATF/mineral
spirits (no acetone at relative's home) and all of them, about 15 unscrewed perfectly.

Let it soak, poor access may take longer and you will likely be pleased with the outcome. Min spirits also
doesn't evaporate as rapidly.

Bill
 

Brad

Benevolent Overlord and site owner
Staff member
Handle bolts are going to need to be drilled out. Should be easy enough. Looks like the handle slot is the key. Above the handle the hole is threaded, below it is a thru hole.
Drill for the proper tap first then enlarge the bottom section.
I will probably make new screws. Pretty simple really.
 

oscarflytyer

Well-Known Member
old gun smith trick for stuck threads. Wintergreen oil. have to ask the Pharmacist for it - kept behind the counter. Put a few drops in, leave 24 hrs, rinse and repeat 3-4x times. It has worked for me when Kroil was a dismal failure.
 

Brad

Benevolent Overlord and site owner
Staff member
I can ask myself tomorrow

Wintergreen oil is methylsalicylate. Good as a topical pain reliever but quite toxic. I don’t even know if we can get it anymore.
 
Last edited:

Brad

Benevolent Overlord and site owner
Staff member
Got the handle screws out. One came out pretty easily with a screw extractor, the other one fought me every step of the way. The acetone/ATF did do a pretty good job overall.
The difficult screw was finally drilled out for the most part and the remainder came out with the drill bit. Never got as far as the threads so they are fine.
There was a little damage done to the bottom of the mould near the handle screw hole.
IMG_3142.JPG
 

Brad

Benevolent Overlord and site owner
Staff member
Here is the mould as it sits now. I did a very light scrub of the cavities with a brass brush. Not a bore brush but a bristle brush with brass bristles. Same brush was used on handle slots.
Top of the mould got a little scrub with 400 grit emery just to remove some rough spots. I think that a piece of marble tile with 400 grit paper on it and some oil will clean the top well.
IMG_3140.JPGIMG_3141.JPG
 

Brad

Benevolent Overlord and site owner
Staff member
Sprue plate is looking nice, at least the parts that matter.

IMG_3143.JPGIMG_3144.JPG
 

Brad

Benevolent Overlord and site owner
Staff member
Next steps will be cleaning the top of the mould and inner mould surfaces. I want to get the mould into casting condition so I can get some bullets to use for lapping the cavities.
New handle screws will be made. I drilled the bottom portion of the mould larger so a 1/4-28 tap would fit easily so I could clean clean the threads above the handle slot. That isn't much more than a simple lathe exercise.
I got lucky and the sprue pivot screw, sprue stop screw, and the set screw for the pivot screw all came out easily. Not much needs to be done with them besides a cleanup.

I really think that once the mould is cleaned further that it will cast fine.
 

Pistolero

Well-Known Member
Left handed drill bits are the answer for rusted in threaded fasteners.
Soak with ATF/solvent, then very carefully center punch with very sharp punch,
actually a prick punch is better for this operation. Then drill with left handed
bits in your reversible drill, starting small, tiny step increases each time. At some
point the drill will catch and suddenly the screw/bolt backs out on the bit.

Bill
 

Brad

Benevolent Overlord and site owner
Staff member
Lapped the mould top surface with 320 grit paper, oil, and a marble tile. Keeps it flat while letting remove the high spots. Took under a minute with light pressure to be happy with the results. Bottom of sprue plate got the same treatment.
Mould faces and around cavities got a very light scrubbing with oil and 400 grit paper. Didn't remove metal but did eliminate high spots of rust.
Put my RRR handles on and put it together for a first casting. Can't lap the cavities without bullets, right?
So far it looks like the mould will be a decent caster.

Not using a more extreme method like Evaporust lets the rust still fill pits yet I can remove high spots. If warranted later I can go nuclear on the mould but it doesn't look like is one will need it.
 

Attachments

  • IMG_3148.JPG
    IMG_3148.JPG
    93.1 KB · Views: 9
  • IMG_3149.JPG
    IMG_3149.JPG
    108.8 KB · Views: 10
  • IMG_3150.JPG
    IMG_3150.JPG
    117.1 KB · Views: 10