You are using an out of date browser. It may not display this or other websites correctly.
You should upgrade or use an alternative browser.
You should upgrade or use an alternative browser.
Savage 99 restification project
- Thread starter Ian
- Start date
Ian
Notorious member
I kind of skipped to the end, not sure how many people would be interested in hand-dovetailing or the other thousand details. Most of this got done 10 minutes here and 30 minutes there between work, sleep, and baby duties and photographing everything gets to be a pain. Your 50 yard targets came in handy for the 1/16" bead and aperture, now I need to blow them up a bit for 75 and 100 yards.
Last edited:
I don't have Bob's .30 hunter mould, but the nose is too wide at the front for the magazine spool according to pictures Brad has posted of it in the past next to bullets I do have. So far I'm pretty happy with the way the ACE 140 is working out, I just need to figure out how to get the internal ballistics to calm down so it will print one group instead of two.
Aha, so that's it, the front of the spool magazine. Have you though about about getting another spool and opening it up to be able to shoot a wider variety of bullet styles? That way you still have the original. That hollow point hunter is pretty accurate.
Ian
Notorious member
I'm not too concerned about it because I'm trying to keep the pressures low in this old rifle and I can make it up with lightweight bullets and velocity. I also like taking advantage of the spool magazine and using pointy bullets with better BC to them, just like I use in both of my 219s that aren't limited by having a tube magazine. The bullets Fiver sent me will work great in my tight 336 and the other one already has a bullet it likes.
F
freebullet
Guest
I'm still waiting for Freebullet to log on and tell me again how much he doesn't like the look of rust blue...
Well, I've never been accused of varnishing my opinion very well. Learned long ago, better to get it out there, than hold it all back or wish you'd said your piece. Least you'll always know where I stand, sincerely.
My exposure to at home rust blue is limited. Most l've seen look super gritty or streakish. Yours looks great to me, in fact......
A few more projects & you'll be putting out some really professional results, have a couple I would be proud to have wear that finsh.....
I can see it now, Ian will quit his day job, stay home with baby while folks stop by to drop guns off all day at;
"Ian's rollover kitty firearm restorations"
Ok, I'll have to admit my level of joking & sarcasm has risen to a point where only the Lord knows when I'm kidding.

Ian
Notorious member
Well, I've never been accused of varnishing my opinion very well. Learned long ago, better to get it out there, than hold it all back or wish you'd said your piece. Least you'll always know where I stand, sincerely.
....And that's why you're one of my favorite people on the internet. I had to jerk your chain on this one, particularly because I agree wholeheartedly with your assessment of most slow rust bluing processes.
Reading again through a book Gunsmithing at Home by John Traister, I learned that the kind of bluing I did on this rifle is technically (or classically, at least) called "Hot water bluing", rather than the true slow rust bluing, so I have been mis-speaking of the process I decided to use on this rifle. The difference is more in the process than the chemicals. Hot water bluing requires the metal be as close to boiling water temperature as possible, and generally the metal is boiled just to heat it, then pulled out and as soon as the last bit flashes dry, the solution is applied exactly as you would if you were to do the slow process...except on the hot metal the rust forms instantly. Also, the metal is re-coated twice very quickly before returning to the boiling water to blacken for only two minutes or so (instead of 15 for the heavier growth of red rust from the slow method). Then the surface is carded (I use 4-0 steel wool because my soft carding brushes left a dull finish on test metal), the metal is boiled to heat it, and the process of applying three quick wipedowns with a dampened cotton ball is repeated.
I put seven coats on the barrel in about two hours not counting set-up or clean-up time. Most of the time spent is carding, especially if doing multiple small parts.
I've done "real" slow rust bluing before and found it ended up matte with a silvery hue, which is sort of the nature of the beast when pitting the metal and carding aggressively as you must with thicker rust. Comparing the durability with a file, after the finish "cures" for about a week, I can't tell any difference except the hot water method, using Mark Lee's Express blue (or brown with same method), can be made to look like that old Colt foot-deep blue. The blue is also repairable.
If I felt like getting an FFL I'd put out a shingle, but not quit my day job. This stuff is a labor of love and honestly even if I got good enough to charge for the work the going rate per hour is half that of a decent auto tech, with no chance to beat flat rate time to flag 60 or 100 hours in a 40-hour week. It would take me a couple of years just to pay for a real lathe, mill, stock duplicator, and tooling, and I'm almost out of trees
Seriously, if you want to try this yourself, the bluing part is easy as follow the short/sweet little instruction booklet from Mark Lee. What's NOT easy is the metal prep, that's the part you might as well hire a pro to do, particularly barrels.
JWFilips
Well-Known Member
now I need to blow them up a bit for 75 and 100 yards.
Let me know the sizes you think you need and I will make some pdf files at those sizes & post them
F
freebullet
Guest
Very nice description of the process.
My wife would say I deserve every moment of retributorial screwing with...
Very nice work you've done there.
My wife would say I deserve every moment of retributorial screwing with...
Very nice work you've done there.
Ian
Notorious member
Let me know the sizes you think you need and I will make some pdf files at those sizes & post them
I think what I'll do is make a stencil and spray paint them larger, these take a lot of toner so I generally only print targets when my work toner is getting too bad to use for the job, but still has some goody left. I print targets for the shop using scrap copier paper until it gets too faint and then change the cartridge. The paper size also needs to be bigger for anything past 50 yards with a brass bead, and we keep the used pages from several desk calendars going into a cardboard sleeve for the purpose of drawing larger or special targets on the back. Nothing goes to waste around here!
I also have a 3' roll of newsprint at home for longer range stuff.Rally Hess
Well-Known Member
Nice work Ian. If you brought that to a gun show up here you'd have ten Finlanders , with hands full of 100 dollar bills chasing you around.
Dey likes dem derr 99's.
Dey likes dem derr 99's.
Bret4207
At the casting bench in the sky. RIP Bret.
Heat makes even cold blue work a lot better IME. I've repaired, if that's the right word, a couple of issues with one of Brownells cold blues where heating the barrel to "very warm to the touch" (scientific eh?) left me with a near perfect match to the factory blue.
So I'm not the only guy that needs a great big target for irons? Had a refrigerator box painted white with an inverted triangle on it at one point. Great target with issue Mausers while it lasted. I hate being effectively blind when it comes to irons.
So I'm not the only guy that needs a great big target for irons? Had a refrigerator box painted white with an inverted triangle on it at one point. Great target with issue Mausers while it lasted. I hate being effectively blind when it comes to irons.
Ian
Notorious member
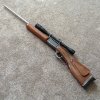
Another little update. I picked up some more "bling" for the old Savage in the form of a Vero Vellini padded safari sling and a pair of The Outdoor Connection "Titan" QD swivels in blackened stainless steel with knurled brass pins. I had to replace the really crappy, extra-long antique-brass finish Chicago screws on the sling with some real brass ones the correct length, and it turned out perfect. The Titan swivels are the perfect match for the barrel band sling mount and the two-screw stock mount, no extra links or hardware to squeak and slap around.


F
freebullet
Guest
Gorgeous!
Barn
Active Member
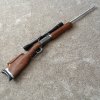
This is what happens when your abilities are closer to Bubba's than Ian's. A good friend installed the barrel and I put on an entry grade piece of walnut. The receiver still has what is left of the original finish.
Best thing about it is that it once was the home of a receiver sight that found a more elegant home.
Best thing about it is that it once was the home of a receiver sight that found a more elegant home.