Plastic Coating and Bullet Size

Ian

Notorious member
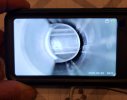
I just scoped mine that hasn't been cleaned since I shot it Sunday and it looks black and white on the monitor, but my phone camera picks up some sepia tones. Like you said it may not be what it looks like.

The bright streaks on the edges of the lands are fine scratches from the Tubbs bullets. Aside from the fine white dust-like particles (I shoot suppressed) there zero lead or plastic fouling.

Oh yeah, forgot the photo...
 

Attachments

  • 20210224_214332.jpg
    20210224_214332.jpg
    413.8 KB · Views: 15
Last edited:

RBHarter

West Central AR
I had a copper fouled barrel that I shot a bunch of cast in .
I had access to an ultrasonic cleaner filled with Hoppes . 2 hours to finally get it all loose . It still fouls a little on the push side of the lands but happily runs 500+ before degrading accuracy .
 

Dimner

Named Man
I think I may have been confused with my carbine gas length wilson SS barrel. That was the one I copper treated down to the metal. I used the tubbs final finish process on it, and it's smooth.
 

358156 hp

At large, whereabouts unknown.
I use Iosso paste to very good effect as well. For copper I use either a Foul Out III or a mild ammonia-based solvent and work at it twice a day until the copper is completely gone. Bore paste will smooth a barrel to a certain extent after getting it completely clean. Polishing where the copper sticks is always a good idea.

I was not impressed with the Tubbs bore laps because they only touch half the barrel's surface, but cast bullet laps have done wonders for me.
Are you mixing your own solutions for the Foul-Out? I've been conserving my solutions for quite a while, but am finally running really low.
 

popper

Well-Known Member
I shoot copper and cast in all mine, never bothered to clean copper. Leading? Only if you can see it just looking down the barrel. Guess that is why I never get trophies.
 

Ian

Notorious member
Are you mixing your own solutions for the Foul-Out? I've been conserving my solutions for quite a while, but am finally running really low.

I haven't yet but all the copper needs is a solution of copper sulphate pentahydrate (blue tree root killer crystals) and distilled water. I use root killer for copper electroplating, should work the same in reverse.
 

Dimner

Named Man
I shoot copper and cast in all mine, never bothered to clean copper. Leading? Only if you can see it just looking down the barrel. Guess that is why I never get trophies.
I'm of the same mind. I'm thinking maybe my bore (pics previously shown) just isn't as pretty as other ones.

I did 3 applications (45 minute soaks followed by a nylon brush) of the pro shot copper solvent and didn't get any blue on the patches. This solvent is good stuff, so I know it works. Doing a kroil soak and bronze brush as I'm typing this, so we will see.

Maybe if I am feeling frisky, I'll take this barrel through the 50 round tubbs final finish process. But my gut says, let it be and shoot some cast that are sized correctly :)
 

Ian

Notorious member
Don't waste your time or barrel steel on the Tubbs bullets unless all you shoot are copper jacketed bullets. The tubbs barely get the throat at all and less than half the land and groive surface. The cast bullets contact the while thing. If you want to smooth it up for cast bullets, cast some dead-soft lead ones, roll them between two metal plates coated in abrasive compound, and shoot them with about 2.5 grains of pistol powder until you start seeing the wear approach the muzzle. Should take about 15-30 to fix it right up, but it WILL clean up and move the whole throat forward a few thousandths.
 

Dimner

Named Man
Okay.... so I am back to working on this project after a bit of a break because of life getting in the way. So here we are:

Bullets are aged. Powder is thrown. Starting to seat the bullets.

So let's talk COAL.

Last night, I used a 4 bullet sample of each of the profiles and color combination that I am going to be shooting. I started using my DIY 'modified case' that is installed in the Hornady (Stoney Point) OAL gauge and measured where these coated bullets hit the lands for my rifle. Pretty interesting results. I was expecting a little bit more of consistent readings from bullet to bullet.

Each bullet/color combo was measured with 4 bullets and each bullet was measured 8 times. With that data the bullets were sometimes 0.020" different from each other. I should mention that these 4 bullets were all the same base to ogive measurement before coating. I can post data if you want, but I didn't see a clear trend.

So. as we know, testing is always the way to determine the best COAL. However my question is What COAL should I start with? Meaning, what measurement of the ogive off the lands should I start with? 0.020" of the average? of the lowest? For this first test, I need a single COAL to work with. I'm looking for the best bullet fit-a-ment here, and I'm at a loss as to where to begin.

Right now, I'm using my AR as a bolt action. Manually feeding the round into the chamber with my fingers and operating the bolt manually. Gas system is turned off, no cycling. So where to being with COAL?
 

popper

Well-Known Member
Forget the gauge. Size to fit throat FIRST! Load short (dummies) of increasing bullet size. Hint - load one without crimp - maybe fired and unsized case. If you hand drop the bolt it will push the bullet back and still extract OK. You find the largest that fit, looking for scraping of PC -paint with sharpie helps. Then increase length until it jams (pogo to open bolt). Set 0.020 shorter to account for slight variations in PC thickness. It's an AR and you don't want jams! If you get the small 6" cycle tire tool you can open the bolt on just the upper, needs that 'kink' in the end. Screw driver will not work! Lever between the front take down and bolt carrier. Ian could make a tool (with his new mill ($$?)) when the upper is still attached. No pogo needed.
 

Ian

Notorious member
Somewhere between .010 and .020" is where I'd start. You're sizing them an actual measured .225", correct?
 

Dimner

Named Man
Yes, sized to an actual .225. Sized before PC and after.

so, between 0.010 and 0.020... That's where I'm kind of stuck. Given that my bullets measure differently with the ogive in the OAL gauge, which one do I use to take 0.020 off of?

Here is an example set of measurements I took:

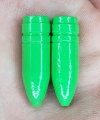
MP NATO 73gr GC John Deere Green:
Bullet #1
Bullet #2
Bullet #3
Bullet #4
Bullet #5
1.987​
2.008​
1.987​
1.988​
1.988​
1.990​
2.002​
1.996​
2.002​
1.994​
1.988​
2.005​
1.988​
1.996​
1.988​
1.988​
2.009​
1.987​
2.002​
1.982​
1.989​
2.008​
1.997​
2.006​
1.990​
1.993​
2.002​
1.987​
1.990​
1.995​
1.986​
2.009​
1.991​
1.996​
1.993​

My instinct is to use 1.988 as the starting point and go ~0.010 off that number. So 1.975" sounds like where I would start.
 

Dimner

Named Man
Forget the gauge. Size to fit throat FIRST! Load short (dummies) of increasing bullet size. Hint - load one without crimp - maybe fired and unsized case. If you hand drop the bolt it will push the bullet back and still extract OK. You find the largest that fit, looking for scraping of PC -paint with sharpie helps. Then increase length until it jams (pogo to open bolt). Set 0.020 shorter to account for slight variations in PC thickness. It's an AR and you don't want jams! If you get the small 6" cycle tire tool you can open the bolt on just the upper, needs that 'kink' in the end. Screw driver will not work! Lever between the front take down and bolt carrier. Ian could make a tool (with his new mill ($$?)) when the upper is still attached. No pogo needed.
Popper,

What you are describing.... I think.... is what I am doing. Or at the least, it has the same effect.

I have the upper removed from the lower, the bolt and BCG removed. I slip a bullet in the 'modified case' mouth below the rim, put the tool with the case in the chamber and hold it so the shoulder of the case is in full contact in the chamber. Then I push the rod to move the bullet forward in the neck/mouth. That's where I think I am getting the bullet fully in the throat I think, right?

More about the modified case. It's a fireformed case from this rifle that drilled and tapped so it would work with the OAL gauge. My cast bullets slip right into the mouth with no tension.
 

Brad

Benevolent Overlord and site owner
Staff member
Hey Ian, could a die like that be made with a simple taper and the diameter is set by the length? Once the nose hits the end stop pushing?

Sounds simple but it might work?
 

Ian

Notorious member
I think it would be best to support the body bands parallel in the die too or the bullet will get wongo. So no, a tapered reamer won't work if that's what you're thinking.
 

fiver

Well-Known Member
put them where they feed the best.

here is my mantra on semi-auto's.
100% of the time every time all of the time....... period.
 

Brad

Benevolent Overlord and site owner
Staff member
I think it would be best to support the body bands parallel in the die too or the bullet will get wongo. So no, a tapered reamer won't work if that's what you're thinking.
Not a tapered reamer, more of using the compound to cut a simple taper. Maybe a short straight section to keep things lined up then a taper for the nose section.

I was thinking more about squeezing the front band just enough to make it slip into the throat instead of wanting to hang up on it,
 
  • Like
Reactions: Ian

Ian

Notorious member
That would work great. I do that on some rifle bullets anyway, like the 225415 with an abrupt front band, all I so is push it down far enough in my form die to knock a taper on it so it parks real nice in a .223 throat.