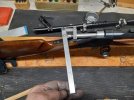
Revisiting the venerable .38-55

Snakeoil

Well-Known Member
The load testing with the .218 Bee and knowing that the cartridge was never intended to use cast bullet is making the whole process lose its luster. I have some more test rounds I'll probably shoot today, but not very excited about it.

I have the Browning 1885 Classic in .38-55 and would like to revisit that rifle. Been reading posts in other forums about the rifle and think it is worth the effort to revisit the 225 and 250 gr bullets. Twist is 1:15 which lends itself to the lighter bullets. Comments at the club say that they lose their accuracy beyond 500 yds. But I think it's worth the effort, since I already have the rifle, to pursue it further.

I suspect my initial efforts were disappointing because of the bullets I was using. Rifle came with 1500 cast bullets by Lasercast and NBC. Both are glass hard and bevel based. I ordered some from Maplewood and told him I wanted 20:1, but his look to be wheel weights or harder. My groups during load test were nothing to write home about. I did not even save the targets. I do have about 80 Montana Bullet Works bullet that are 15Bnh (not cheap) and may try those again. I can borrow a mold from Charlie or one of the othe members and cast up different bullets before I find a keeper and then order a mold for that bullet.

Part of the revisit is I'm thinking about making a breech seater. I've been threatening to do this for quite a while but ever got around to it. With winter here, this is a good time to make some chips and get the job done.

I thought about selling the rifle since I want to stay away from heavy recoil due to that floater in my left eye. But with a 225 or 250 gr bullet, it should not be much worse than my 03 with 210 gr bullets. Plus, it is such a pretty gun that I hate to part with it. I see that George Peterson is making wood for these now. So maybe I'll restock it with a shotgun butt and pistol grip stock and put the original wood away. It's all therapy, right?
 

Michael

Active Member. Uh/What
If you have any Trial Boss on hand or have access to some, give it a try. Very mild even with a full case, might wonder if the round even fired. With all of the mold options out there you could keep yourself quite busy. Currently sold out, but MP even makes one, granted it is geared towards the 375 H&H and wears a GC, can be had in 2 or 4 cavity, even HP, listed at .378 dia. How does it shoot? Wish I could tell you, maybe someone here could tell both of us. Good I hope, have new one that is getting very impatient.
 

CZ93X62

Official forum enigma
My time-in-grade with the 38/55 isn't long, but I have enjoyed it greatly.

If you have been here for a while, You heard about the flatband Win 1894 that got its 25/35 chamber spoiled via dacron filler. I sent the rifle to Jesse Ocumpah in Oregon to have it rebored/rechambered into 38/55.

Load data in 38/55 is squirrelly. A lot of it seems to cater to rifles with loose bores shooting undersized bullets. With well-fit cast bullets I got into a bit of trouble at first--as I stair-stepped loads with IMR-4198 and Lyman #375449, I got loose primer pockets and higher velocities and recoil a lot earlier than I expected from using Ken Waters' data in his "Pet Loads" tome.

In my rifle 22.0 grains of IMR-4198 gives ~1300 FPS to both the Lee 250 grain plain/bevel base bullet and to Lyman #375449. This is black-powder ballistics. 26.0 grains is the rifle's max load with #375449, giving about 1575 FPS and decent accuracy. 27.0 grains expanded primer pockets.

90% of my shooting in 38/55 gets done with the black-powder-level loads.
 

Brad

Benevolent Overlord and site owner
Staff member
My Win 94 375 Win gets treated more like a 38-55.
I can assure you that a 270gr bullet at even 1500 fps in that rifle is painful.
It now gets a 200 gr at 1400 and it is a peach to shoot.
 

Snakeoil

Well-Known Member
I had to make a split adapter ring so a friend could use a modern scope level on his Lyman STS. When that was done, I thought I'd start noodling on a breech seater for the rifle. First order of business was to make an expander plug so I could open up a .38-55 case to allow a bullet to slip-fit into the case. All my spare dies have been modified to M-dies and given away. So, I took out the RCBS .38-55 die and made a new plug for the seating die to open up cases. I figure at some point, the case I use will wear or get damaged. So, might as well be able to make more. Used a Gr 8 1/2-20 bolt and machined it to 0.380 and the 0.378 bullet slips in nicely.

With that done, I started on the breech seater itself. But with a pencil and a dial caliper, not machine tools just yet. I have a chunk of 1" aluminum barstock that is just about the right length. One of my goals was to design the tool so it could be converted for use in different calibers. But, the dimensions of the High Wall demand certain dimensions for the tool and does not leave a lot of meat to make interchangeable caliber sections. I did scribble up a design using 48 TPI thread to hold an end cap that would capture a cartridge case. But not sure it's the right way to go, at least not with aluminum. Too easy to damage those fine threads. So, as usual, staring at something long enough allows me to see the obvious. I think I'll make a universal breech seater that will use separate cartridge caliber adapters made from empty cases with their own internal ram. I know this is not new. I've made those cartridge adapters for others. So far, measurements indicate that there is enough room for the ram to push the bullet deep into the rifling and still have enough left to retain the ram in the case when it is extracted from the chamber. This also allows the tool to drop into the cutouts for the breechblock, rather than be slid forward and then rotated to engage the cutouts which would be required with a tool that has the portion that enters the chamber as part of it. It also means I can use two lugs rather than one, so everything stays straight when the bullet is seated. There is room under my Unertl to slide it under and the drop it down into the receiver cutouts.

So, that's as far as I got. I'll probably dwell on this tonight while watching a good series we found on Netflix (The Sinner). Might have a few more synapses fire with ideas to simplify the design further. I find that my designs tend to start out very complicated and the more I work on them and think about them, the simpler they become. I love elegance in simplicity.

I also am not so proud as to copy the ideas of others. No sense reinventing the wheel, right? I did a search on the web and saved several photos of various breech seater designs and mine will probably use some features from those. Only so many ways to create mechanical advantage in a small area. I'm leaning towards using a toggle link system instead of a big cam. The reduced friction by not using a cam should be a good thing. I suppose I could put a small bearing on the end of the ram. But now we are getting complicated again.
 

Ian

Notorious member
After doing it manually in a bolt-action rifle, I vowed if I ever designed one again it would be hydraulic, like a miniature port-a-power. My elegance in simplicity became learning how to breech-seat the bullet with the primer, about 3 microseconds before the shot.
 

fiver

Well-Known Member
the 448 is the plain base version of the 449.
buddy of mine shoots it on top of 9.5grs. of unique and that load is a pusssy cat along with stupid accurate.
i'd explore 359 and 360 as sizing options before i got too worked up about breech seating or shoving them backwards down the muzzle type stuff.
 

Missionary

Well-Known Member
A little research and you will find there are fellers who make HW seaters and on You Tube how some are made.
I to like to see how the old "marksmen" used their's as we are "attempting" to beat their long established targets / scores.
 

Snakeoil

Well-Known Member
There was a member here to posted back in 2018 about breech seating.Screen name is GWarden. He's also written other good posts about wind flags and such. I was going to revive the breech seating thread. But since I don't see much, well really any discussions about it here, I thought I'd just let it lie.
 
Last edited:

CZ93X62

Official forum enigma
I do like how well the Lee 250 plain base shoots in my levergun. I cuss and discuss the bevel-based design and the problems it caused with the Lyman Greasy Kid Stuff regimen--leaking lube at the bullet base. I get some relief via a gas check of the proper size and careful depth setting of the bullet in the sizing die. The checks hold upfor 15-20 sizings, then I expand it with the NOE tool. The real solutions would be to remove the 'lip' in the mould that creates the bevel-base casting, but---boiled down, it's really kind of a First World problem.

Bevel-base bullets remain kind of a PITA for lube sizing. Just sayin'.

Once I get my sight restored (I'll save you the details.....), 38/55 slugs in Condor Cuddler Metal will be getting some R&D. The 38/55 is a PERFECT deer rifle for the brushlands and forests most of my hunting happens within. It is also pretty good black bear medicine if the need arises.
 

Snakeoil

Well-Known Member
Gun will be used for silhouettes out to 500 yds. My days of killing Bambi's mother and father are long over.

Made decent progress on the breech seater. The challenge is recognizing all the fit issues associated with the Miroku High Wall. That little ejector stop/director at the back of the action needed to be considered. I gave up on making a sketch/drawing. Making a part, trying it on the rifle, modifying it to fit better and repeat was the better way for me. Just got word that Charlie is sick as a dog and the gunshop is closed for the next week to 10 days. A member tested positive for Covid. I just took a test and am negative. He was at Charlie's on Wed and at the match on Sunday. He brought brownies, too. And of course, I snarfed more than my share that day.

So, I guess I'll be back in the basement tomorrow finishing up the breech seater.
 

Snakeoil

Well-Known Member
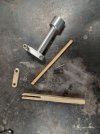
Time to post progress photos for the breech seater.

After making the body and the toggle bracket, I mocked things up out of wood to for proof of concept. Understanding where clearances had to be allowed for the angles associated with the handle and the toggle was easier to see with the wood mock-up than trying to noodle thru it on paper.

So, her is the finished body and toggle bracket along with wooden parts used to test how it works and determine the clearances.
20221207_133531.jpg

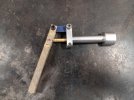
Same pieces assembled.
20221207_133302.jpg

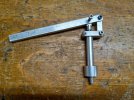
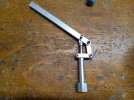
With all the clearances figured out, machined the parts from aluminum. Only steep arts are the screws and the plunger rod. Note the 60 deg nose on the plunger rod. This is to help guide it into the hole in the back of the cartridge adapter and center it in the cartridge adapter bullet ram. The ram in the adapter will have a mating 60 deg female end.
20221207_184151.jpg20221207_184202.jpg20221207_184316.jpg

Tomorrow I'll make the actual cartridge adapter that holds the bullet and also contains the ram that breech seats the bullet.

When I am done with it, I'll disassemble it and take photos of the various parts in case anyone wants to make one.
 
Last edited:

Snakeoil

Well-Known Member
So today was your typical 2 steps forward, 1 step back process. I tried the seater and it functioned perfectly with one small exception. It did not seat the bullet deep enough into the bore. I was so wrapped up in making all the parts that somehow, I neglected to think about just how deep the bullet needed to be, which determines the required stroke of the tool. I kept thinking about how far it had to move out of the case, forgetting that the case was shortened by quite a bit to eliminate the case binding in the chamber due to opening it up to allows a bullet to slip in.

So, I knew I had to lengthen the stroke, which meant a longer link. No big deal. But the longer link meant I had to relieve the end piece of the plunger to accommodate the increased angles of the operating handle. I spent a lot of time with a file removing material, trying, removing more, trying, etc., etc., until I got to the point that I thought I had it. And I did. But now the slug in the cartridge adapter than pushes the bullet into the bore was being pushed almost entirely out of the cartridge adapter. I sat at my bench and just stared at the parts for longer than I care to admit. The other problem I noticed that even if I could get the bullet deep enough into the bore. Because the Browning has an ejector, when it spits the cartridge adpater out, the slug stays in the chamber. Not a big deal, but a PITA to tip the rifle up to get it to fall out. Too many steps for a match. Should be simple, not complicated.

This is when I realized that if I made the plunger rod longer, the slug would screw to the end of the rod. That takes care of the slug staying in the bore. And it also keeps the cartridge adapter in place on the plunger, which has to be longer now. But it makes for a much simpler tool and still allows the tools to be changed over to different calibers. But this design means my drop-in design is a no-go. It now needs to be inserted into the chamber and the tool then rotated to engage the lug into the action recess. That means my two lugs need to become 1 lug.

All the pictures I had saved of other designs all had one lug. I thought I could have two with the drop in design. Foolish me to think I had thought of something new regarding a tool that has been around for 100 years. I think they call that arrogance. Shame on me. In my defense, I do enjoy coming up with solutions to problems on my own. But this time, I should have taken advantage of 100 years of experience.

So, I'm now about 99% sure I have a decent design. I've already machined the body to have only one lug. I also made a new toggle bracket because my first one could not be modified to allow the tool to rotate in the action to engage the lug. I've also made sure it will work with a Unertl or Lyman mounted to the rifle.

Today should have been church at Charlie's Gun Shop. But Charlie is sick as a dog and at least 4 members have tested postive for covid. So, I stayed home and spent the day in the basement. Good news is the change in design forced me to make an adapter plate for my Index head that I bought probably 5 years ago and never used because I could not mount it to the mill. I was always going to get a piece of 1/2 alum plate to make an adapter plate. Well, I needed it today and made one from 1/4" aluminum plate. Probably the best part of my day, today.

Tool looks different now. Too tired to take pictures. Cleaned the shop, washed my hands and poured a glass of wine. Wife made Moros Y Cristianos. For you flatlanders that Moors and Christians otherwise knowns as Black Beans and Rice. It's a Cuban dish. Not politically correct, but damn good eatin'. And now, neither of us are Cuban. But I had an office in Coral Gables for years and Cuban food is one of my favorites. Best thing Castro ever did was chase all the Cubans to Miami.
 

Missionary

Well-Known Member
Be fun to be able to read all the "adaptions" that went into the first to the last seaters that were in use 100 ears back.....
My memory fails me at this moment. Are you seating a bore rider or groove diameter cast bullet ?
 

Bret4207

At the casting bench in the sky. RIP Bret.
In Michigan the 38-55-255 was viewed by the deer hunters I knew growing up as "the best caliber". Black bears included.
Yup, if you had one in the Adirondacks in the day you were considered well armed.
 

Bret4207

At the casting bench in the sky. RIP Bret.
I would have thought you'd make the seating depth adjustable. Pretty sure I've seen that in old pics from the Schuetzen days.
 

Missionary

Well-Known Member
All the "old ones" I have seen headspace off the rim and the ram is adjustable for the seating depth.. Even the simple straight "push" types Bore diameter (BP) .