
Ian
Notorious member
Disclaimer: The following information is the product of my own meandering experience and includes a few original ideas and concepts of my own and some that others have been kind to share with me, and is always subject to change as I learn more. It is in no way intended to be the last word, or even the first, just something that may help. Feel free to share like or contradictory experiences and otherwise contribute to the knowledge fund.
The Basement Articles #2, Part one:
Following the statement "Fit is King" and considering first the static part of fit, we must learn exactly what is the dimensional goal we wish to achieve with our fixed ammunition. The most logical method I've found to do this is to make a sturdy impression of the rifle's chamber and throat from which detailed measurements can be taken.
While several common methods exist to cast impressions of chambers, I personally prefer the impact or "pound casting" method, and will limit my own discussion here to this type. (everyone else feel free to add descriptions of other methods that work for you) This method was invented, I believe, by some clever cast-bullet shooter friends of mine who were seeking an inexpensive and simple method of getting the rifle's critical internal measurements without the hassle associated with pouring molten Cerrosafe, sulphur, or other things directly into the chamber.
Essentially, a "pound cast" is made by installing a lead-filled cartridge case and malleable slug into the chamber and throat, locking the breech, and expanding the whole thing to fit the chamber and throat area completely via hydraulic force applied by a rod inserted through the muzzle. Here's a step-by-step general idea of how I do it, which is by no means intended to be comprehensive or absolute.
1. Clean the rifle's chamber, throat, breech face, breech locking mechanism, and bore with brushes and solvent, dry and put a thin film of oil the chamber and throat. Use a HEAVY oil, such as gear lube or case lube to prevent sticking and make it easier to extract the slug after forming. Apply grease or oil to the locking mechanism per normal lubrication practices.
2. Obtain a roll of vinyl electrician's tape, a brass or steel rod longer than the barrel but that will insert into the barrel when wrapped in one layer the tape, a medium hammer, a gas check of the caliber of the gun being casted, a sacrificial cartridge case that has been fired in the gun and still has the primer intact, a propane or other hand-held torch, large spoon, a heavy-for-caliber bullet mould or slug mould made with a bore-diameter hole drilled in a piece of hardwood, enough pure lead to cast several heavy (long) bullets or slugs, enough wheel weight or similar-hardness alloy to fill the cartridge case, and some pliers.
3. Melt the wheel-weight (or similar) metal in the spoon with the torch, heat the top half of the case enough to anneal it (dull glow ok, and pour the molten metal into the case while it's still hot. Fill to about halfway up the neck with the alloy and allow it to cool. Grasping the case with pliers and gently lifting and tapping the case head on a solid surface and re-applying heat to keep the alloy melted for a few more seconds will help dislodge air pockets and settle the alloy.
4. Using the same spoon, cast some heavy bullets using pure lead, or make a slug mould that will cast a cylinder of bore diameter that is about 1/2" longer than the longest "standard" bullet the gun is intended to fire. This is a general idea, you just want enough metal to fill what's left in the case neck, the whole throat, and the origin of the rifling.
5. Clean and oil the alloy-filled case, oil and install the dead-soft bullet or slug into the mouth by hand, and insert it into the chamber. Force the action closed behind it and place the gun muzzle up with the buttplate on a firm, non-marring surface (like a clean work mat or cardboard).
6. If a gas check is available, start it into the muzzle squarely with a punch, concave side up. Wrap the metal rod with a closely spiraled, single layer of electrician's tape to protect the bore, and build bore-diameter "bushings" for a reasonably snug, centering fit on the ends and middle of the rod if one layer of tape isn't sufficient to support the rod in the center of the bore. Use the rod to push the check all the way to contact the slug, making sure the tip of the rod is captured inside the cup of the check and that the check hasn't gotten turned sideways. Sometimes a fired .22 rimfire case or pistol cartridge case can be used instead of a gas check depending on the caliber of the rifle. The object is to keep the tip of the rod from sinking and sticking into the soft lead. The check provides a sort of piston and separation point.
7. Hold the rifle and support the rod at the muzzle securely with one hand, and firmly tap the end of the rod with the hammer to compress the alloy and annealed case within the chamber. You should be able to feel the rod sink as the metal swages to the form of the throat and chamber, and suddenly the blows should begin to feel very solid. Once it feels like the rod isn't going to go any deeper, invert the gun while holding the rod in place, place the tip of the rod on a solid surface (floor) and open the breech while leaning on the buttstock to apply pressure to the rod. Pushing on the rod while opening the breech will aid in extraction and help prevent broken extractor mechanisms.
8. After removal, inspect the pound cast for complete fillout. It doesn't have to be pretty, just filled enough to measure accurately in the critical places such as both ends of the neck, total chamber length, throat entrance, and the entire throat up through the ball seat and into the full land height.
9. Now you have something to measure and keep around that won't shrink, dry out, or change with time, and will have a much better idea of the fit parameters of the particular rifle.
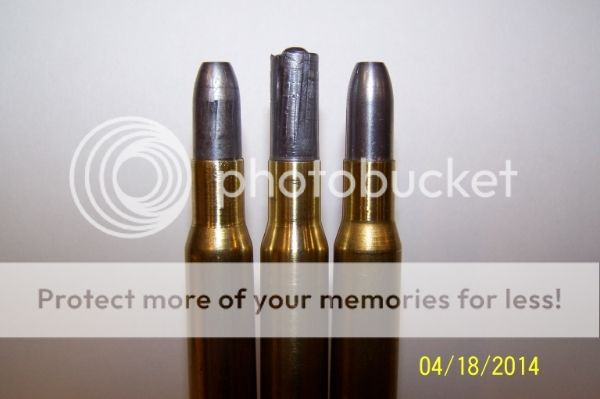
Here's a photograph of a pound cast I made for a wildcat experiment, together with some ammunition built to closely fit the chamber and a bullet designed to fit the throat throat based upon pound cast measurements. Should be close enough to get the idea.
The Basement Articles #2, Part one:
Following the statement "Fit is King" and considering first the static part of fit, we must learn exactly what is the dimensional goal we wish to achieve with our fixed ammunition. The most logical method I've found to do this is to make a sturdy impression of the rifle's chamber and throat from which detailed measurements can be taken.
While several common methods exist to cast impressions of chambers, I personally prefer the impact or "pound casting" method, and will limit my own discussion here to this type. (everyone else feel free to add descriptions of other methods that work for you) This method was invented, I believe, by some clever cast-bullet shooter friends of mine who were seeking an inexpensive and simple method of getting the rifle's critical internal measurements without the hassle associated with pouring molten Cerrosafe, sulphur, or other things directly into the chamber.
Essentially, a "pound cast" is made by installing a lead-filled cartridge case and malleable slug into the chamber and throat, locking the breech, and expanding the whole thing to fit the chamber and throat area completely via hydraulic force applied by a rod inserted through the muzzle. Here's a step-by-step general idea of how I do it, which is by no means intended to be comprehensive or absolute.
1. Clean the rifle's chamber, throat, breech face, breech locking mechanism, and bore with brushes and solvent, dry and put a thin film of oil the chamber and throat. Use a HEAVY oil, such as gear lube or case lube to prevent sticking and make it easier to extract the slug after forming. Apply grease or oil to the locking mechanism per normal lubrication practices.
2. Obtain a roll of vinyl electrician's tape, a brass or steel rod longer than the barrel but that will insert into the barrel when wrapped in one layer the tape, a medium hammer, a gas check of the caliber of the gun being casted, a sacrificial cartridge case that has been fired in the gun and still has the primer intact, a propane or other hand-held torch, large spoon, a heavy-for-caliber bullet mould or slug mould made with a bore-diameter hole drilled in a piece of hardwood, enough pure lead to cast several heavy (long) bullets or slugs, enough wheel weight or similar-hardness alloy to fill the cartridge case, and some pliers.
3. Melt the wheel-weight (or similar) metal in the spoon with the torch, heat the top half of the case enough to anneal it (dull glow ok, and pour the molten metal into the case while it's still hot. Fill to about halfway up the neck with the alloy and allow it to cool. Grasping the case with pliers and gently lifting and tapping the case head on a solid surface and re-applying heat to keep the alloy melted for a few more seconds will help dislodge air pockets and settle the alloy.
4. Using the same spoon, cast some heavy bullets using pure lead, or make a slug mould that will cast a cylinder of bore diameter that is about 1/2" longer than the longest "standard" bullet the gun is intended to fire. This is a general idea, you just want enough metal to fill what's left in the case neck, the whole throat, and the origin of the rifling.
5. Clean and oil the alloy-filled case, oil and install the dead-soft bullet or slug into the mouth by hand, and insert it into the chamber. Force the action closed behind it and place the gun muzzle up with the buttplate on a firm, non-marring surface (like a clean work mat or cardboard).
6. If a gas check is available, start it into the muzzle squarely with a punch, concave side up. Wrap the metal rod with a closely spiraled, single layer of electrician's tape to protect the bore, and build bore-diameter "bushings" for a reasonably snug, centering fit on the ends and middle of the rod if one layer of tape isn't sufficient to support the rod in the center of the bore. Use the rod to push the check all the way to contact the slug, making sure the tip of the rod is captured inside the cup of the check and that the check hasn't gotten turned sideways. Sometimes a fired .22 rimfire case or pistol cartridge case can be used instead of a gas check depending on the caliber of the rifle. The object is to keep the tip of the rod from sinking and sticking into the soft lead. The check provides a sort of piston and separation point.
7. Hold the rifle and support the rod at the muzzle securely with one hand, and firmly tap the end of the rod with the hammer to compress the alloy and annealed case within the chamber. You should be able to feel the rod sink as the metal swages to the form of the throat and chamber, and suddenly the blows should begin to feel very solid. Once it feels like the rod isn't going to go any deeper, invert the gun while holding the rod in place, place the tip of the rod on a solid surface (floor) and open the breech while leaning on the buttstock to apply pressure to the rod. Pushing on the rod while opening the breech will aid in extraction and help prevent broken extractor mechanisms.
8. After removal, inspect the pound cast for complete fillout. It doesn't have to be pretty, just filled enough to measure accurately in the critical places such as both ends of the neck, total chamber length, throat entrance, and the entire throat up through the ball seat and into the full land height.
9. Now you have something to measure and keep around that won't shrink, dry out, or change with time, and will have a much better idea of the fit parameters of the particular rifle.
Here's a photograph of a pound cast I made for a wildcat experiment, together with some ammunition built to closely fit the chamber and a bullet designed to fit the throat throat based upon pound cast measurements. Should be close enough to get the idea.

Last edited:
