Bullet for the M39

Josh

Well-Known Member
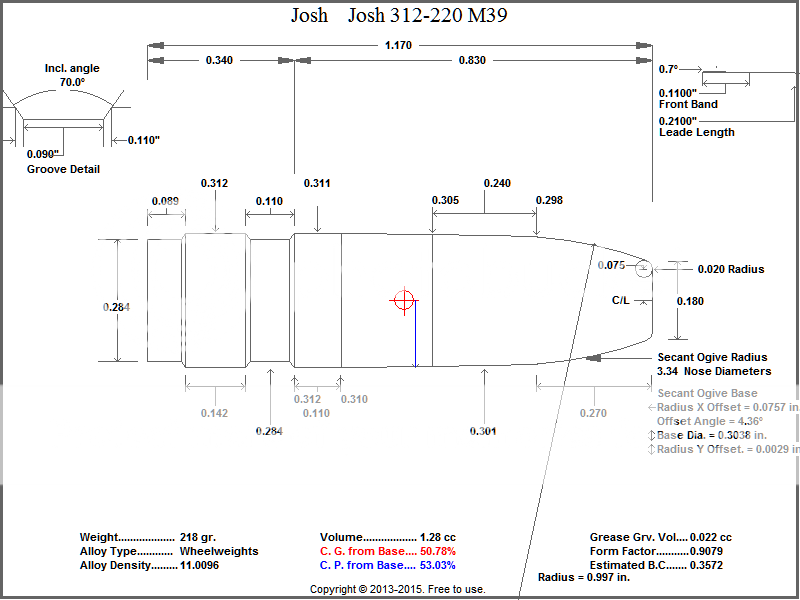
Earlier I took a chamber cast with sulfer, using the numbers from this cast I have drawn a bullet I hope will fit the very long "D" throat this rifle was cut with.

The cast measurements are as follows.

Neck length 0.400"
Throat length 0.312"
Throat taper 0.312" to 0.310"
Bore diameter 0.310"
Bore land diameter 0.305"

This said, I am having issues with the C.P. and C.G. due to the throat and the need to fill it. So that said, lets see if we can work through this design, I plan to get a 4 cavity mould with this and another design from Accurate.


Ian

Notorious member
I've been scratching my head on this one off and on all day. I'm having trouble understanding why you made the nose so small if the bore is .305", I would think starting at .303" instead of .298" and bringing it up to .305" where you did, then coming up to .310" but about .100" farther forward, and continuing on up to .311" right about where your .310" front band diameter is marked and then lay back the taper to .312" at the rear of the front band in front of the lube groove would fill the throat better and give the nose some better guidance out front. Something like that. Otherwise you'll have no support entering the throat until the bullet is already halfway out of the neck and had ample opportunity to get sideways. The nose will be hanging in space and be able to gimble opposite of whichever way the base swings at launch. I'm afraid what you'll find is you'll end up seating the bullet with half of the lube groove out of the case before you get it to group. Also, adding more girth to and in front of the front band will add mass to the rear. If you abandon the .020" radius just off the meplat and bring your ogive right down to a sharp .180 you can shave a little mass off the front. If the sharp edge bothers you, use a cup-shaped nose punch when sizing and seating and it will accomplish the same thing...with a smaller frontal area.
 

Josh

Well-Known Member
I've been scratching my head on this one off and on all day. I'm having trouble understanding why you made the nose so small if the bore is .305", I would think starting at .303" instead of .298" and bringing it up to .305" where you did, then coming up to .310" but about .100" farther forward, and continuing on up to .311" right about where your .310" front band diameter is marked and then lay back the taper to .312" at the rear of the front band in front of the lube groove would fill the throat better and give the nose some better guidance out front. Something like that. Otherwise you'll have no support entering the throat until the bullet is already halfway out of the neck and had ample opportunity to get sideways. The nose will be hanging in space and be able to gimble opposite of whichever way the base swings at launch. I'm afraid what you'll find is you'll end up seating the bullet with half of the lube groove out of the case before you get it to group. Also, adding more girth to and in front of the front band will add mass to the rear. If you abandon the .020" radius just off the meplat and bring your ogive right down to a sharp .180 you can shave a little mass off the front. If the sharp edge bothers you, use a cup-shaped nose punch when sizing and seating and it will accomplish the same thing...with a smaller frontal area.
This throat one of the throats that I just don't want to believe, it is like a 300 blackout leade with a very low and long angle (0.75°?) So i am going to do the suggestions you made and add it here in a bit. I was thinking the same thing about that front band, I may crimp groove it like your 31-188G because the more I think about what you were saying about alloy flow the more I believe you are correct about needing a place for the alloy to go.

This may turn into a 188G heavy by the time we are done. ;)
 

fiver

Well-Known Member
the C.O.G. being behind the C.O.P. isn't a problem.
if you want them closer together just bring the nose diameter up to engraving the rifling and you'll move the COG forward slightly.
to move it back again, make the front band thicker [to the rear] you got .020-.030 too much lube groove width there anyway.

to drop weight just move the nose backwards.
the COG does not have to be in the center of the Boolit.
I prefer it to be to the back.
if we were shooting a shotgun or straight line rifled barrel then weight forward is fine.
we are spinning them around and around and rearward will work out better.
 

Josh

Well-Known Member
Ok, here is the latest design based on the above suggestions. I believe this is better by far than the first design.


JSH

Active Member
I had more issues with solving proper sized brass than bullets.
The neck portion of my chamber is pretty generous.
Jeff
 

Josh

Well-Known Member
I had more issues with solving proper sized brass than bullets.
The neck portion of my chamber is pretty generous.
Jeff
This rifle is a peach compared to my russian 91/30, the bore is a perfect 0.310", throat is shaped correctly, brass needs minimal sizing even in a full length die. My only complaint about this Finn is it needs a taller front sight, with 204 gr Wolf ammo or 150 gr PPU it shoots about 13" high at 100 yds.

I am hoping to be able to load a 220 gr bullet at 1900-2000 fps and get the sights semi regulated at 100. If I can get it shooting no more than 3" high then I will be taking it hunting this year.
 

Ian

Notorious member
The Swedes and Finns are famous for the high sight regulations, I'm sure there's a good reason for it if one was curious enough to do some digging, my interest stopped at just finding a fix that I as the shooter/reloader could live with. I've filed a deep scallop in the rear blade and re-cut the notch before on more than one rifle, usually that takes care of it.

I still agree with Fiver that the lube groove is too long (and maybe a bit shallow) and you could pick up some rear mass there, but before you go changing anything I want you to try some of the stuff we talked about in PM so you can see for yourself.
 

JWFilips

Well-Known Member
Josh,
I'm liking that second drawing Love to hear what Ian and fiver say about that one. This is pretty exciting stuff to me
 

Josh

Well-Known Member
Josh,
I'm liking that second drawing Love to hear what Ian and fiver say about that one. This is pretty exciting stuff to me

I will be making some minor adjustments to this design yet. Version 3 will have a deeper lube groove and a longer front band. Ian has been kind enough to send off a few sample bullets to give a try in it. I will be using them as a pin guage to make sure my nose measurements are actually correct.
 

Ian

Notorious member
Dug out a few last night, still need to get things labeled and packed up, and dust off the sizer.

I find that coating a bullet in layout blue or light dusting of Krylon (not Rust Oleum), dropping it in the chamber, tapping it a couple times with a brass rod and back out again is very telling of how a bullet fits initially and what it is trying to do as it engraves. Even doing a couple where you drive them pretty far into the throat helps see where metal is moving and how the bullet guides itself. It's just about impossible to hit the bullet base squarely with a brass rod, so you can see how the bullet reacts to crooked starts. You can also drill a hole through the primer pocket of a resized case, seat a bullet, poke it in the chamber, and simulate launch with a brass rod and 2# hammer...just whack it solidly one time with follow-through and tap the whole mess back out again.
 

Ian

Notorious member
I swept my shop and loading room into a box with your name on it, you're gonna have some studying to do. Check the respective Accurate drawings for specs on the various bullets, and note the difference in the noses between the 185G, 188G, and 190X. The 190X is the Morse Taper nose for the XCB throat that taught me a lot about what not to do, and makes me wonder why the NOE 208 bullet exists, but you should try it anyway.
 

Josh

Well-Known Member
I swept my shop and loading room into a box with your name on it, you're gonna have some studying to do. Check the respective Accurate drawings for specs on the various bullets, and note the difference in the noses between the 185G, 188G, and 190X. The 190X is the Morse Taper nose for the XCB throat that taught me a lot about what not to do, and makes me wonder why the NOE 208 bullet exists, but you should try it anyway.
Ok, so I got a most excellent care package. Inside it was a smorgasbord of bullets. Here is a list of them at their OAL and such. Only the Lee engraved on the front band.

311679 - OAL 3.060" chamber and eject with no issues

31-185G? (black pc) - 2.890" At this OAL there is no engraving on this bullet but it gets stuck in the throat and if looked at funny drops out.

Lee 312-185 - Chambers and ejects fine at 2.824" no engraving, pulls bullet at 2.938" catches first drive band

31-185G - OAL 2.917"Chambers and ejects fine no marks

Ace 235 PC - OAL 3.191" this round at this OAL actually got stuck, it is too long to eject. No engraving and not hard to close the bolt on this.

31-190X - OAL 2.960" chamber and eject fine, no marks.


So it looks like I have to fatten the nose of my 220 gr design a hair or I won't be able to seat to crimp groove. It will be seated about halfway back the front band.

Interesting, this throat is a real interesting piece, what I would do to get my hands on reamer prints for this chamber...
 

fiver

Well-Known Member
if you get the diameters correct they don't have to be sitting right in the throat, filling all the air gaps.
if you move the boolit forward and it then fills all of those gaps your doing the exact same thing, you just need to work out the alloy flow and the powder timing to get it all in there straight.
the nose shape and drive band taper will help you out right there.
so you then just need to play with powder speed and ignition to make it shoot.
 
  • Like
Reactions: Ian

Josh

Well-Known Member
Fiver, that makes sense, so what I did is use the numbers from the ACE 235 that was not touching any of the throat, but when I made this last version it I made all the numbers as if I was crimping at the bottom of the crimp groove. So if this gets a hair fat, I can seat it deeper by 0.045" and have a small jump.

Remember that this design shouldn't engrave the throat in any way but it should be very close. So, unless we see an issue with this design, this is probably it.


fiver

Well-Known Member
as long as you got those numbers from the 310 start forward correct... yes.
that is a lot of increase in diameter from your original post.
so let's look at what we got here.

58ish% meplat.
.02 lube capacity.
[stupid] crimp groove,,,,,,, probably needed with that groove filling front band however.
rear heavy.
can add a cup point if necessary
secant ogive nose [should feed well and contribute to a good BC]
alloy density accounts for tin/antimony.
strong rear drive band.
and you'll be able to adjust the diameter some with an alloy manipulation.


I would ask for a Zero on the +- tolerance.
that 308/7 out on the nose is my only double check right now.
but if your sure your not gonna touch metal until the round is fired then the larger diameter right there will be your bump-stop in the engraving/pressure rise of the whole process.
 

Ian

Notorious member
Josh, Lamar's post #14 says it all in a nut-shell. This is why I mentioned tapping inked bullets into the throat and knocking them back out again, and doing that in stages (like take one and just barely make it stick, then knock it out and observe how the bullet BEGINS to start touching things and what it's touching and where, then take another and tap it in just a little farther, and finally a third bullet and tap it in further still, etc.) You need to see what the bullet sees during launch, and if the bullet's nose is shaped right for your throat, it can jump .050" with the right powder and still hit "nothing but net" dead center of the throat and shoot unbelievably well.

That is most of the secret to getting jacketed velocity and accuracy with cast bullets in automatics. It took me a lot of years to get over the old wive's tale about noses having to engrave the rifling upon chambering in order to shoot accurately. But still, the nose has to be the right shape or jumping them won't work.

PS the black powder coated ones are 188Gs, note the crimp groove. The PC job on those is poor, but I did a few in a hurry once to try them in my .308 with subsonic/suppressed loads, they shot ok that way but nothing to make me change from the heavy ACE bullets, so I donated the leftovers to you to sacrifice to the berm gods, or for killing cans, or whatever.
 

Josh

Well-Known Member
Josh, Lamar's post #14 says it all in a nut-shell. This is why I mentioned tapping inked bullets into the throat and knocking them back out again, and doing that in stages (like take one and just barely make it stick, then knock it out and observe how the bullet BEGINS to start touching things and what it's touching and where, then take another and tap it in just a little farther, and finally a third bullet and tap it in further still, etc.) You need to see what the bullet sees during launch, and if the bullet's nose is shaped right for your throat, it can jump .050" with the right powder and still hit "nothing but net" dead center of the throat and shoot unbelievably well.

That is most of the secret to getting jacketed velocity and accuracy with cast bullets in automatics. It took me a lot of years to get over the old wive's tale about noses having to engrave the rifling upon chambering in order to shoot accurately. But still, the nose has to be the right shape or jumping them won't work.

PS the black powder coated ones are 188Gs, note the crimp groove. The PC job on those is poor, but I did a few in a hurry once to try them in my .308 with subsonic/suppressed loads, they shot ok that way but nothing to make me change from the heavy ACE bullets, so I donated the leftovers to you to sacrifice to the berm gods, or for killing cans, or whatever.
So how do I take the throat engraving and turn it into the static fit of this bullet? I get why I should, and I will, but will it aid in the final design of this bullet or is it a learning experience?
 

fiver

Well-Known Member
the angle right there is a mechanical fit. [only it's not because your not seating it that way]
your static fit comes as things move forward and flows into the barrel.
having only .002 over groove diameter allows everything to press fit into place.
the trick is to envision things moving forward and pressing the rifling into place.
where is that extra lead going to go?

the nose isn't a concern yet, your going to see engraving from the start of the secant turn rearward.
it's the initial contact point you need to focus on.
is the boolit getting there straight, or does it have a provision to pull everything straight?
the guidance from the ball seat area is what is helping the nose when it contacts the rifling.
everything being filled at that point is what stops the nose from being shoved rearward and failing.
 

Josh

Well-Known Member
Ok, I got my terms wrong, I always called it static fit while it sat still and dynamic fit as it moves. I don't see how it can slip sideways when everything is pretty close to press fit. I will pop a few of the 188G's in the butt and see what happens. I will post pics when I do.