
You are using an out of date browser. It may not display this or other websites correctly.
You should upgrade or use an alternative browser.
You should upgrade or use an alternative browser.
Case sizing question
- Thread starter Intheshop
- Start date
............................it would be repeated by others in controlled experiments, with repeatable results.
Hey, don't wait for me. If someone else can do it too, the more the merrier. The dog's going to live and I just have to keep it sedated, give it steroids, make it rest and watch it. Caught a break for once.
I'll go out and scrounge when I return home from town.
KeithB
Resident Half Fast Machinist
Agree 100% that more data GENERATED UNDER IDENTICAL CONDITIONS is better than a single test of very limited sample size. I do think one test with 10-20 samples should be enough to get an idea of what is happening in general and should at least be enough to answer the OP's original question. The emphasized text in my first sentence is for a reason. If we're going to have multiple tests we better all do it the same way...
Rick H
Well-Known Member
Not fireforming, but a firing or two after. I didn't anneal beforehand, might be a good idea.
When would be the best time to anneal? I have been using once fired 30/30 brass but just purchased a batch of new for conversion to 7x30W. I had been getting split necks after 4 or 5 loadings but lost relatively few during the fireforming process. Not sure when the best time would be. I have an annealing rig and have started to anneal my fired cases, but after they have been fireformed. Perhaps after sizing and before fireforming?
What are your thoughts on this?
I started a new post on this...enough topic creep...thanks.
Last edited:
Agree 100% that more data GENERATED UNDER IDENTICAL CONDITIONS is better than a single test of very limited sample size. I do think one test with 10-20 samples should be enough to get an idea of what is happening in general and should at least be enough to answer the OP's original question. The emphasized text in my first sentence is for a reason. If we're going to have multiple tests we better all do it the same way...
Oh, crap. Mine won't count. I already went out and did it.
I found a dozen like cases fired the same rifle;
LC-84, fired an unknown number of times using jacketed bullets;
Trimmed all to match the shortest one (1.747");
Ruined two with the trimmer - don't ask. Down to ten;
Lubed lightly and evenly (even the shoulder and inside the necks) with LEE case lube;
Marked case heads with a sharpie and physically segregated five for WITH and five for WITHOUT the expander;
Ran five through the LEE FLR die WITH the expander;
Ran five through the LEE FLR die WITHOUT the expander;
Note that I measured/recorded length of each case before sizing and then measured/recorded length of each case after sizing without letting go of that case so I didn't mix anything up.
Observations:
1) The cases I resized WITH the expander SHRANK an average of .0355"
2) The cases I resized WITHOUT the expander GREW an average of .0118"
Not what I expected. I had even resized one recently WITH the expander and was certain it GREW. Come to think of it, I don't think I measured it first, so shame on me. Can't trust my own assertion on that one.
The shoulders on the cases resized WITH the expander fared far better than the ones WITHOUT in that the shoulders wrinkled badly WITHOUT the expander. This may be the first time I've ever sized or partially formed a case without an expander. I don't remember ever having even thought to do it without.
If I were to do any more case forming in my lifetime, which I doubt I'll do except for making 222s out of 223s,... maybe, I may or may not pursue this further because with either method, the resized cases come out longer than needed for 222s.
I made a spreadsheet but haven't figured out how to attach it as an image.
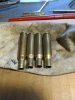
Shoulders:
WITHOUT expander on the left, WITH expander on the right. The extreme difference in length in the photo is just an illusion borne of poor photography.
Attachments
WITH EXPANDER | | WITHOUT EXPANDER | ||||||
CASE: | START: | END: | DELTA": | CASE: | START: | END: | DELTA": | |
1 | 1.7470 | 1.7080 | (0.0390) | 6 | 1.7470 | 1.7610 | 0.0140 | |
2 | 1.7470 | 1.7100 | (0.0370) | 7 | 1.7470 | 1.7560 | 0.0090 | |
3 | 1.7470 | 1.7170 | (0.0300) | 8 | 1.7470 | 1.7600 | 0.0130 | |
4 | 1.7470 | 1.7125 | (0.0345) | 9 | 1.7470 | 1.7590 | 0.0120 | |
5 | 1.7470 | 1.7100 | (0.0370) | 10 | 1.7470 | 1.7580 | 0.0110 | |
AVG.: | 1.7470 | 1.7115 | (0.0355) | AVG.: | 1.7470 | 1.7588 | 0.0118 | |
ES: | (0.0090) | ES: | 0.0050 |
Last edited:
KeithB
Resident Half Fast Machinist
That is exactly the process to generate data that I was thinking of. I think your test counts big time. I do have a question - what type of expander did you use, a stem type that sizes on insertion into the case mouth, or the expander ball type that you pull through on the exit stroke?
That is exactly the process to generate data that I was thinking of. I think your test counts big time. I do have a question - what type of expander did you use, a stem type that sizes on insertion into the case mouth, or the expander ball type that you pull through on the exit stroke?
This would be the "newer" LEE style which has a long, gentle taper going into the case mouth, and a rather abrupt rounded shoulder coming back out. LEE refers to this as the "EZ Expander." They are not mirror-polished either, rather a bit coarsely finished. Years ago, I polished up a couple expader balls in Lyman dies and they drug heavily through the necks and would collect brass deposits which I had a time cleaning off. I sanded them with 320 grit and they pulled through with much less resistance. The LEE's come with something like a 220 grit finish, perpendicular to the direction of the brass movement, and don't drag nearly as much. My assumption has always been that they should "stretch" necks less, but I never pursued it.
From LEE's site:

Please note that on the table above, I have moved the header "WITHOUT EXPANDER." It should now align correctly with the appropriate columns.
Going from Excel to Word to here, the table got wonky on me and the headers were misaligned. Looked so much better/easier to read in Excel but when I tried to insert that, it got really ugly.
Going from Excel to Word to here, the table got wonky on me and the headers were misaligned. Looked so much better/easier to read in Excel but when I tried to insert that, it got really ugly.
Ian
Notorious member
Next thing I'd try is knock the shoulder back with a .277 Wolverine die (no expander) then form the rest of the neck and shoulder with a .222 die. This process worked wonders for eliminating shoulder wrinkles when pushing .30-'06 shoulders back to make .30 XCB cases by using a .358 Winchester form/trim die as an intermediate step. For making 6.5x55 cases out of '06 I used the .358 die followed by a sawed-off '06 die and then a 7mm-08 on just the neck and finally the 6.5 die to get the final neck diameter and shoulder angle set in place. There are plenty of other ways, too, I just used what I had. When pushing the shoulder back in stages, the length increase seemed a lot more dramatic.
RBHarter
West Central AR
I'd try it but I don't have the correct measuring tools on hand .
I bought a set of 256 mag dies for a step die to make 222 from 223 then found a couple of 100 ct bags . Before that I had probably only a 3/5 survival rate on 223-222 I didn't measure before the trim but it was a lot of trim .
I bought a set of 256 mag dies for a step die to make 222 from 223 then found a couple of 100 ct bags . Before that I had probably only a 3/5 survival rate on 223-222 I didn't measure before the trim but it was a lot of trim .
Next thing I'd try is knock the shoulder back with a .277 Wolverine die (no expander) then form the rest of the neck and shoulder with a .222 die...................................When pushing the shoulder back in stages, the length increase seemed a lot more dramatic.
Right, if the goal were to make 222s out of 223s, I'd have been looking more closely for a "best way." I wasn't especially careful in that and just set the shoulder back in three or four steps (step = one each in/out cycle, same die), turning the case a little each time I withdrew it. Even so, the difference between expander and no expander, as far as the shoulder goes was pretty dramatic. Surprising to me that your brass grew more when using more stages, but my mind jumps to a hypothesis which sounds good inside my head.
You don't know how stupid an idea sounds until you hear it "out loud," but in this case - in text, so here goes....
My uninformed/under-formed hypothesis goes sort of like this in my brain:
The gentler process of using subtler stages massages the material more reliably and evenly forward, whereas the barbaric method of one-pass scrunches it up? Please note the question-mark. This is not an assertion.
I aced a philosophy class in college by making it a point to never actually answer a question, rather to pose another question, so don't look at me for an actual answer. Seriously, it worked.
Regarding the cases I mutilated:
Those aren't "lube dents" either. They are hard, sharp creases and I personally wouldn't trust them at full pressure. They are not going to "blow out" like a lube dent. They are also ugly and my dad taught me long ago that lube dents are a mark of shame. These are hideous.
So, the cases which had shrunk in forming had no/fewer/smaller "dents," which means to me that brass was not displacing into folds of creases, but it went somewhere, because the case was shorter. Where did it go? I have not checked to see if there's a "doughnut" at the junction of the shoulder/neck.
The cases which grew in forming had more, and more severe dents, which means some of the brass went into the folds of those creases, plus went forward as well. When I can get back out there, I should probably also measure neck wall thickness and wall concentricity.
NOTE:
Keith,
I also noticed that the actual expander I used shows up in the top right of the photo of the brass, if that helps.
I must also come clean and admit that I bent my decapping pin when it slipped from the die, slid through the cut in the ram, through the primer arm hole and behind the toggle link, where I could not see it. I started to lift the lever to see where it went and bent the pin. I invented a brand new cuss-word getting it out.