PID question

LongPoint

Member
Will, I bought a PID from a fellow over on the CB forum. It uses that exact controller. I have not had a bit of trouble other than a loose wire on the thermocouple and that was easily fixed.
Marvin
 

Will

Well-Known Member
That was very enlightening. Shows how dumb I am about electronics. Buying one is starting to look better.
What did you have in yours when complete?
 

Mike W1

Active Member
That was very enlightening. Shows how dumb I am about electronics. Buying one is starting to look better.
What did you have in yours when complete?

Depends!!! If you can scrounge some sort of enclosure, some wire, etc. you can get by pretty cheap, otherwise it's easy to stick upwards of $25 just for that kind of stuff alone.

The kit you linked has a PT type thermocouple. You want a K type. If you ask they'll probably switch types for you.

If you ever want to use it on a hotplate my experience with a Mypin was not satisfactory. My Auber holds a hot plate ± 1° F. My cheap Rex about a 6° C Hi to Low. FWIW.
 

Will

Well-Known Member
I watched a couple videos on building them. I may end up ordering the stuff and building one.

I figure I can take some scrap metal and weld up a box.
 

KeithB

Resident Half Fast Machinist
Too bad Heathkit isn't still in business. I built several VTVMs and an AM/FM radio from kits I got from them.
 

yodogsandman

Well-Known Member
That was very enlightening. Shows how dumb I am about electronics. Buying one is starting to look better.
What did you have in yours when complete?

MYPIN TA4 PID
40A SSR
Heat Sink
4"x6 ft TC type K
Type K male/female plug
Lighted Switch
2 Lights
Panel Fuse Block
8 Contact Block
Panel 110V Plug
Various wires and connectors
 

358156 hp

At large, whereabouts unknown.
Okay. Here's what I did. I started out with a power control box from a dead PC. Around here the computer repair places give them away, that's how I got mine. First of all, remove anything that doesn't look like a box. I reused the original electrical socket and switch on my first one and added a glass fuse holder. The next one will be done differently because it wasn't worth the effort to reuse the power socket and switch. Here is the box I set aside for the second one I'll be building to run a heat-treating oven, and also for a larger oven to bake guns after Cerakoting them.
BOX-1.jpg
BOX-2.jpg
BOX-3.jpg
 
Last edited:

358156 hp

At large, whereabouts unknown.
I'm going to skip the construction details and go straight to the pics of the finished PID. I built this PID to suit my tastes, and there are some extra features you won't find on the base models :p
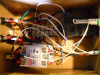
. I wanted interchangable thermocouples, and the yellow plug socket in the front is made specifically for thermocouples. I planned on using this PID for multiple projects, so all cords are detachable and/or upgradeable. I may overthink things too much. The wiring is (sort of) color coded by circuit, I figured I was going to screw this up and I wanted to be able to trace the circuits in a tight space without yanking on the wiring to see where everything goes. A friend on mine built a similar PID, but all his wiring insulation is black. I underestimated myself with this project though, the PID worked perfectly from the moment I turned it on. And it has worked without a hitch for over two years now. These are all common, off the shelf components I ordered from Amazon with the exception of the TC plug and socket, and the TCs themselves. The chinese TCs were awful, and I went through five of them in a year. The plug-ins came from Auber Instruments, as did the replacement TCs.
PID-1.jpg PID-2.jpgPID-3.jpg
PID-4.jpg PID-5.jpg PID-6.jpg
 

Will

Well-Known Member
I'm gonna start working on this in a few weeks. I'm sure I'll have more questions.

What gauge wire are you using for the internal 120V connections?
 

Mike W1

Active Member
14 - Should have added I figured as long as you breaker/fuse it at 15 amps it'd probably be adequate, but 12's even better. Mines also crimped and soldered FWIW.
 
Last edited:

358156 hp

At large, whereabouts unknown.
I used 12 ga. I've read 14 ga. is also suitable, but I like a bit of of an edge. I crimped & soldered all terminals, and used heat-shrink at the joints as well. I prefer stranded wire, not the solid core, it's more flexible, and crimps well to boot.
 

JonB

Halcyon member
Lots of good info so far.
I'll add my 2¢

My venture into building a PID, started with the Cheapest components possible.
But, I wanted it to display Fahrenheit.
So from "Deal Extreme", for $26 and free shipping from Hong Kong...4 weeks later, I got a PID ...that was defective.
http://www.dx.com/p/xmt612-pid-1-2-pid-temperature-controller-black-205178#.VZcgwvlViko
BUT
I was impressed with the manual, compared to what I heard about the Mypin.
So I ordered the same unit from a USA source, for a few bucks more, but shipping was extra.
http://www.lightobject.com/JLD612-Dual-Display-PID-Temperature-Controller-P43.aspx
While this PID can be setup to control temperatures on many things heating and cooling, I was happy to see the "example in the manual is just about exactly what we want it to do with a lead alloy pot.
http://fhupiora.fhupiora.home.pl/JLD612Manual.pdf

If you are going to build one, it's best to have a good grasp on it capabilities.
It'll help you understand how to set the parameters.
 

358156 hp

At large, whereabouts unknown.
Mypins can easily be programmed to read in Fahrenheit, mine is.

That said, I'll be ordering my next set of components from Auber anyway.