T. Miller: 2nd model Brown Bess which was used in the F&I war and the American Revolution!!

JWFilips

Well-Known Member
Ok Guys, here is a very interesting project of restoration and conservation: It is a 2nd model Brown Bess that has seen service in America in the French & Indian War and the American Revolution! It was carried by a Scotch descent person though two American conflicts in the 18th century!
It belongs to Ted Miller who gave me the opportunity to restore it!
First off I had to find a source of 18th century English walnut! English walnut in England is pretty much depleted! but I found a source of 18th century English walnut! This gun was made in the 1740's so I needed a close match!
I found it and had it shipped to me from the source in England! All I had to do now it to rebuild the original weapon!
I will be adding to this thread as soon as I can piece the before's and afters from my archive!
So I will leave you hanging for now!
I know ...the suspense!
 
Last edited:

JWFilips

Well-Known Member
This is a 2nd Model Long Land Brown Bess built in 1748; In its life it saw action in the French and Indian War and then after in the American Revolution. the American Revolution history is Documented by the owner The gentleman that carried it in that war was Scottish Immigrant and fought for the American Cause ( an interesting note is in the 18th Century they were call "Scotch" which today has fallen out of use!) He was an Ancestor of the owner, and Disliked the English!

Apparently this Musket has been in the owners family Since the end of the French And Indian War.

When this firelock came in to my shop in October 2008 It was in a very bad condition. It had lost about 25% of its wood. Major crack that was splitting it down the length of the barrel channel and into the tang area. The lock was missing parts. The side plate was missing the front half!
The barrel pins were non existent with only one large brass bolt holding it together with a brass acorn nut!

First off since it was so old I had to find a source of the proper English Walnut wood that was used use in the mi 1700's In England! That was a big challenge but I was able to procure a proper amount of the British Armory 18th Century English walnut ( no easy task but I can't believe they still have ancient hoards of wood!

Before I started any work I took it to my studio to document the state of the musket for the "before photos"......... Needless to say This project was well documented with probably over 400 images
So it is going to take me some time to post the Before and afters for you folks.

I think I will start off with some before's for you folks to see the mess it was!
If you guys blow up the full length shots you can see the stock damage and the huge barrel pin holes!

Miller-Bess-016.jpgMiller-Bess-024.jpgMiller-Bess-012.jpgMiller-Bess-Sideplate.jpg
 
Last edited:

JWFilips

Well-Known Member
OK Next : Let's tackle the barrel Pin Holes: I start with being able to secure the barrel to the stock properly to continue with the rebuild of the wood!
First I have to rebush the barrel loops with brass and redrill for proper size pins
In the first photo this is how I received it!
BarrelLoopsAsReceivedWithBrassBolts.jpg

LoopBushedWithBrass.jpgBarrelLoopsNowDrilledForProperPin.jpg
 
  • Like
Reactions: 462

JWFilips

Well-Known Member
OK then maybe we move to the Side plate! You see those hashmarks! No doubt confirmed kills on the Red Coats!
Also the lock side and the tang area:
Miller-Bess-OriginalSideplate before and after.jpgLockInlet-Before&after.jpgTangArea-Before&after.jpg
 
Last edited:
  • Like
Reactions: 462

JWFilips

Well-Known Member
OK Now we will move on to rebuilding the upper forestock:
I like yo use a lot of beef with the proper grain ...so when cured I can shape it to the original contours !
Ok Upper forearm firstUpperForestock-Rebuilding.jpgUpperForestock-Rebuilding.jpgReplacementWoodUpperForestock.jpg
Near nose cap next
RepairworkNearNosecap.jpgUpperForestockNearMuzzleCapArea-RepairWork.jpg
 
Last edited:

JWFilips

Well-Known Member
One thing to keep in mind in all this: They are the things you see..... Not documented but away used ....in conservation; is an acid free light linen cloth adhered to the barrel channel with acra-glass to prevent future damage!
 

JWFilips

Well-Known Member
Now you guys are Humbling me! I'm just doing the things that I have learned....Thank you!
I put this out to all of you ...You only have to ask questions and I will share what I have learned!
Jim
 
Last edited:

Ian

Notorious member
Please, take us on a journey explaining how you fixed the hammer and the brass side plate. How in the world did you match up the brass composition so it looked right? How did you repair the wrought iron hammer at such a delicate place and make it all look 300 years old?
 

JWFilips

Well-Known Member
Ok The hammer was not repaired.....It is a casting from an original Hastings Bess lock ( E. J. Blackly & Son, England) It was easier to find a casting from an original then find the top half of and old original ( since that piece was lost a hundred or so years ago;))

File and polish the casting to get it to how it would look when the lock was new ....then coat with a heavy application of Super Blue cold bluing, Take it outside, put a soup can of Clorox on the grill and when it it boils throw the polished and cold blued part in and pull it out every minute or so to check the amount of etching taking place when it matches the lock plate's age etching......throw it in a Sodium Carbonate solution bath to stop the action. This most times will duplicate age etching with a little more work......Back it the shop....Give it a few selective "distress" marks...... Coat it with super blue again and rub it down with 0000 steel wool to pretty much take it off the majority of the metal but the etched and distressed areas will stay darkened.
If you look at the before's of the hammer on the lock plate, the hammer (cock) definitely did not match the lock plate...It appears to me that someone in the past rust browned this part for some reason or possibly it was a replacement part. The English finished steel hardware, locks and barrels "bright"......Since I was restoring this Firelock I wanted to make the lock plate and cock look like they went together.I can't remember right now but I may have did a bit more of the etching process on the jaws that hold the flint. Black Powder is harder to clean in that area and they get the brunt of the burning powder!

_D207739.jpg
_D207762.jpg


Now to do some "Myth Busting"!
If this is the original lock of that 2nd model Bess I doubt that it served in the F & I War, Judging by the date on the lock plate!
I was only going by what the family history stated! I believe it came to America, early in the 1760's and was removed from the British stores by those rascally "Rebels" & that is how it and a Scotch Immigrant came together to fight the British in the American War for Independence!
If I go by the family history....If that is correct and it served in the French and Indian War, this lock is a replacement for the original

In my next post I will try to answer your questions about the side plate!
 
Last edited:

JWFilips

Well-Known Member
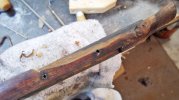
Now to address the "Side plate". In my mind this is the most historical part of this firelock!
Those "Hash Marks"! Why are they there? Could it mean this Firelock was used for hunting after the War....and they designate the hunters skills over the years.....5 ( possibly 6 ) whitetails. Maybe bear or even wild hogs since this Scottish ancestor was from the Carolina's?
I would rather believe a more morbid providence, that these represent British Officers killed by the "Soldier Scotsman"fighting for Independence in America!

This one was a real mind-bender...Everyone knows the easiest way to match two pieces of something up is with a straight butt-joint! Silver solder 2 pieces of brass together and you have a repaired part!
Yes but it will look repaired. I had to come up with an Idea to solve that issue!

This repair once I finally came up with it, was not documented! It was my Idea and at the time it was my "trade secret" .....hey a guy has to have one!....But I'm sure I'm not going to be cornering the market in the Restoration / Conservation business at this stage in my life so here is my secret ...it is so simple the mind's thought process hides it!

I had no problem securing the proper brass replacement part ,
When Reeves Goehring was alive, GOD rest his soul; He produced brass castings with the Old English Brass formula, and his castings were all from original Firelocks! I'm sitting on probably 200 pounds of his castings in my shop! Heck he sold them for $10 a casting.... For Flintlock building his castings were the best soft brass ( not the hard wax cast bronze that is available today!) His castings, while coming from original parts could be bent, shaped, and altered easily!
Butt plates could be easily peened to fit an existing butt plate mortice, etc. Hands down the best!
He is gone now but his daughter has what is left of his inventory. She tried to have his moulds cast by the same foundry but because the original formula was causing the EPA to come down on them.....they had to stop casting his mix.

So let's continue:
Now I have an identical part ...of course without the 250 some year patina.....

I came up with a plan to disguise the butt-joint; I took the original rear part and cleaned up the break for it was a square sharp end ....I then matched up the new sideplate to the old and scored a cut mark on it. I cut the new piece with a jewelers saw to match the angle and position of the old cleaned up break! Putting the 2 pieces together the joint was pretty perfect but I know if I silver solder them I would have a shinny line!
I did not want that so what I did is turned the two parts over and cut a keyway with a diesinker chisel ( Don't us many power tools) perpendicular across the joint of both parts. I shaped a piece of scrap brass to fit this key way...I actually made it stand "proud" above the back surfaces of the plate to increase strength....I then silver soldered the piece in the keyway and was quite lucky that the solder did not flow to the front side of the butt-joint! I then re-inleatted the plate where the "proud key" was.

All I had to do now was to do some peening and distressing of the front side of the joint to disguise the splice.

Again Super Blue to the rescue! It puts a great patina on quality brass when applied with, not a cloth, but 0000 steel wool! When the blueing solution hits the steel wool there is an exothermic reaction so you have to work fast...just blend the patina to match the old!

Image below: You folks know where the repair is...However if you did not see the before's could you tell

RestoredSideplate.jpg
 

JWFilips

Well-Known Member
I probably should mention that none of the processes above are environmental friendly or safe for the person working with it! :rolleyes: