Any "MY PIN" PID Controller, Builders Here?

seagiant1

Active Member
Hi,
Finally got my parts together for a PID Controller, I want to build with a "MY PIN" PID.

Wondering if any here had used this brand PID and how it worked out?

I THINK, I have the wiring on the PID straight as the inputs differ between PID's for power, SSR, TC, hookups.

Hopefully will be able to use this with different TC's for my lead pots, and a Gun Kote Oven, I built!
My Pin.jpeg
 
Last edited:

Ian

Notorious member
I got one for my pottery kiln to use for heat treatment. So far all I used it for is the thermometer, the kiln's own control box is plenty accurate and consistent for what I need as it turns out.
 

hporter

Active Member
That is the one used.

My Pin PID.jpg

You can use a connector like I did on mine - then it is just a matter of unplugging them to swap them out, or to put a separate one permanently in your toaster oven for PC'ing.
 

Jeff H

NW Ohio
Never used one of these personally, but have used many others in the past.

"They all do the same thing!" That's what one of my professors kept telling me after he'd showed me how to set one up and then gave me a totally different brand for the lab test some 30 years ago. It's funny - I was so frustrated with him over that, but I end up telling my students the same thing about many different "black boxes" you have to set up/configure.

OUTPUTS will differ for on/off (digital or discrete) control and analog control. You may or may not have both options or be able to configure the output. For the ones I use (dated), I have to swap a board the size of a postage stamp and make a configuration change.

INPUTS typically allow options based on the terminals provided/which you choose, PLUS configuration changes. For example, an RTD uses three terminals, but a TC uses two. TCs come in various types, so a configuration setting will be required to choose RTD or TC (or even an analog signal (0-10V or 4020mA) from an analog output, from a temperature transducer.

It has been common, since the inception of these "single-point controllers" that several brands all use the exact same controller, but change the appearance of the faceplate and, possibly make changes to how you navigate the menu. Price, how easy it is to navigate the menu and the faceplate are often the only differences between three or four "brands of these things, YET, "they all do the same thing."

They all need power, they all have an input (for the sensor) and an output (what switches/controls power to your SSR, SCR, MDR, etc., which switches power to the load - the heating element), both of which can vary or be configured and they all control the same way - Proportional, Integral and Derivative logic embedded in the chip. MAINLY, the difference comes down to how difficult or easily the menu is navigated, and sometimes what they call stuff. Documentation can vary wildly in quality, and those translated to English by non-english-speaking countries can be confusing - because sometimes they use "proper English" and we're used to our on colloquialisms.
 

hporter

Active Member

seagiant1

Active Member
Hi,
That's interesting!

Never saw that stand before.

Yes I am now installing the plug on the ends of my 2 TC's that I want to use between the Lead Pot and the Gun Kote Oven.

Then I can move back and forth between the two without having to use the same TC

I'm using the same box that HPORTER is using, not to big not to little.

My RCBS Pro Melt is the older style with just a thermostate, but hope this Controller helps keep Temp steady as the Pot level changes.

Here is what I found on how the PID is wired.

Does this jive with how everyone's MYPIN PID is hooked up???

mypin-ta4-wiring-diagram-10.jpg
 

hporter

Active Member
I built mine back in 2014, and I can't find the schematic I drew up at the time.

But if you get stuck, I would be happy to open my case up and confirm how I wired mine.

It has worked great over the years. I can't image not having one now.
 

seagiant1

Active Member
I built mine back in 2014, and I can't find the schematic I drew up at the time.

But if you get stuck, I would be happy to open my case up and confirm how I wired mine.

It has worked great over the years. I can't image not having one now.
Hi,
Thanks, well it is interesting that you made the long side the front instead of the short side

Had not thought of that?

I think I have it figured out, but the different PIDs, ARE, wired up a little different, according to Brand!

I've heard a LOT of People saying, they really did not think they needed one, TILL they got one, and now, can't think of casting with out it!

I'm making it more for the Gun Kote Oven, (the oven thermostat had too many temp swings!) where I really need it, but may find out I like it as well on the Lead Pot!
 
Last edited:

Jeff H

NW Ohio
Did a wiring diagram come with the controller?

Separate sheet? Printed on the inside of the box? Sticker on the controller?

There should be at least one of these, and usually a combination.
 

JonB

Halcyon member
I went with the JLD-612
while the PID is made in China, the seller (lightobject) is a well known USA manufacturer and not just a ebay china merch flipper.
Also,
the manual is in easy to understand English.
The last section of the manual is a application example, which is a High temp furnace, which is basically what we are using them for, so it gives you a good idea of what the parameters should be set to.

 
Last edited:

seagiant1

Active Member
Did a wiring diagram come with the controller?

Separate sheet? Printed on the inside of the box? Sticker on the controller?

There should be at least one of these, and usually a combination.
Hi,
Yes, there is actually a nice sheet that comes with the controller and admittedly...

The set up for straight heat control (no Alarms) is the easiest set up, but..

If you are not used to electric schematics, can get "lost in the sauce", and...

I only want to do this once, so first hand knowledge, confirmed is the way to go.

I'm sure, I have it figured out, just thought someone with that controller could confirm my schematic I posted?
 

Jeff H

NW Ohio
Hi,
Yes, there is actually a nice sheet that comes with the controller and admittedly...

The set up for straight heat control (no Alarms) is the easiest set up, but..

If you are not used to electric schematics, can get "lost in the sauce", and...

I only want to do this once, so first hand knowledge, confirmed is the way to go.

I'm sure, I have it figured out, just thought someone with that controller could confirm my schematic I posted?
I understand, believe me.

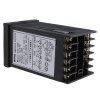
I snagged this from Amazon. It LOOKS like your model, but typically, model numbers are configured to indicate all the features and options supplied on YOUR controller. What you are seeking SHOULD be the same on every model. Looking at the diagram on the controller case, it looks like you are OK.

If your temp is wonky after hooking it all up, try reversing the TC leads. Same for the SSR. Incoming power should not matter, as it's AC and the polarity changed every .016 seconds anyway - and is not specified as "hot/N" anyway.

Your TC will have different colored leads. I'm using J-type, so WHT is POS, RED is NEG

I guess out of habit, I search out industrial TCs, so I get "flying leads" (just wires) hanging out the end of the sheath - easy to ID colors. Then, I add my own connectors. As you get used to using this thing, you'll use it more and probably explore other features. Pick a plug/receptacle and get some extras and you can wire up spares or have one on each thing you control. Sounds like that's your plan anyway.

The attached is an example and may not be identical to yours, but the connections you are using are pretty universal. Just always douible-check your wiring before applying power. My dad was a tool & Die maker for forty years. He always said "it's all in the setup," meaning that it might take until lunch to get everything perfectly arranged to make a five-minute "cut" after lunch. I try to take the same approach with electrical. My line is "If you want to get done on time, you'd better slow down."

You will eventually become more comfortable with the wiring and configuration. If you get lost in the menu, you can usually hit "escape" (or whatever they call it on yours) several times and find your way out to the operator display. If you think you've mucked up the configuration, and can't figure out what it is you did wrong, you should be able to do a factory reset and start over. Trust me, as horrible as that sounds, it's usually faster, and definitely less painful that way.
 

Attachments

  • MYPIN DIAGRAM.jpg
    MYPIN DIAGRAM.jpg
    35.3 KB · Views: 1

Jeff H

NW Ohio
I went with the JLD-612
while the PID is made in China, the seller (lightobject) is a well known USA manufacturer and not just a ebay china merch flipper.
Also,
the manual is in easy to understand English.
The last section of the manual is a application example, which is a High temp furnace, which is basically what we are using them for, so it gives you a good idea of what the parameters should be set to.

Dang, @JonB , I LIKE that one! Amazing price too.

Your observations on the manual are SUPER important. When a production line is down, losses are tallied in tens of thousands of dollars per minute and being able to sort something out quickly is critical.

The one in your link looks like it is 24VDC only for input power. Are you using a separate power supply or do you have one which works with an AC input?

EDIT: Found it. There's also one which is AC/DC and is a whopping $3 more. Model ETC-JLD612-A

 
Last edited:

seagiant1

Active Member
Hi,
Thanks, this guy goes thru setting the PID up, which, I'm happy for!

He also does other brands so may come in helpful for others

You can go to his main video page and find what you need. (LOTs of Vids!)


Jeff H

NW Ohio
The videos are cool. Wasn't a "thing" when I was doing this for a living and I spent a lot of time on the phone walking people through it.

Something to remember as you navigate these menus is that there is a very limited interface with which to tell the controller what you want it to do, and with which it has to tell you what it is doing - no keyboard, big display, mouse, etc.

PARAMETERS, the individual settings you seek to change, will be organized in parameter GROUPS.

Each PARAMETER will have various VALUES you can select and accept.

You first enter "program" mode (not really "programming"),
then find the parameter GROUP you need,
locate the parameter you wish to change,
select the desired option from those available,
"accept," "save," whatever,
then back out.

They are like filing cabinets in that way:
Each GROUP is a DRAWER;
Each drawer holder numerous FOLDERS, or PARAMETERS;
Each PARAMETER or FOLDER holds numerous OPTIONS, of PAPERS to select.

Accepting the parameter change is like putting the selected paper in the folder. Then you put the folder back in the drawer, close the drawer, and then you are back to the high-level menu.

Fortunately, changing the set-point is usually easier and more accessible.

One term that trips people up sometimes is "SP" which is the "Process Variable," or temperature of what you are sensing.

"SP" is, obviously "Set-Point," or the value you wish the temperature to reach and maintain.

After watching the videos to set one up, you will eventually see the pattern in navigating the menu and remembering how to do it becomes easier. Until you haven't done it for a year.
 

JonB

Halcyon member
Dang, @JonB , I LIKE that one! Amazing price too.

Your observations on the manual are SUPER important. When a production line is down, losses are tallied in tens of thousands of dollars per minute and being able to sort something out quickly is critical.

The one in your link looks like it is 24VDC only for input power. Are you using a separate power supply or do you have one which works with an AC input?

EDIT: Found it. There's also one which is AC/DC and is a whopping $3 more. Model ETC-JLD612-A

I bought mine in 2012. The link I had saved was to a lightobject website that came up 404 error, so I just did a quick search for the JLD-612 part number and the amazon link popped up first, I didn't look at the voltage or anything. Whatever model I bought in 2012, I am using 120vac power.
 

JonB

Halcyon member
Ian mentioned the dual plug for the TC. I've read that the less connections the better for a TC. We may not need the precise accuracy these things can deliver or the loss of precise accuracy due to the resistance of extra connections, but I connected my TC directly to the PID unit, just so I wouldn't have future issues. My PID is dedicated to using in a Lee Pot, but the TC is just "clipped in place" in the pot, so I can easily swap Lee pots (I have two of them).
 

Jeff H

NW Ohio
Ian's right, but I wouldn't worry at all about a single connector in a TC setup as long as the plugs and receptacles are MADE for TCs - don't cobble something up from the junk drawer or splice a bunch of stuff together. Even the wire you run long lengths of, from a TC to whatever receives the signal, is specialized ("extension wire"). Got a call on a job once where all the controllers were giving wacky readings. Someone ignored the note on the diagrams calling out "extension wire" for TCs, which were spaced all over a very large oven, and ran several hundreds of feet regular copper wire.

I've used plugs/receptacles a lot in industry and worked with a really big aerospace company that used them extensively in testing stuff that keeps people from falling out of the sky and dying. They did only use TCs once and then tossed them though. I still have a few I dug back out of the trash. Work fine for what I'm doing.

Not a thing wrong with direct connections either. I swap between two pots and a "pizza oven" with my controller, so it makes a convenient change-over, leaving a dedicated TC on each device. I think it was last spring when I finally got tired of turning screws and actually spent some money on connectors and a couple new TCs.
 
Last edited: