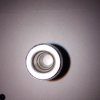
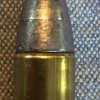
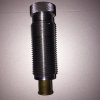
Crimp die

Brad

Benevolent Overlord and site owner
Staff member
Necessity is the mother of invention, or so I was told as a child.
I like to load handgun cartridges on the Dillon 550. I also like to seat and crimp in separate steps. That eliminates the ability to seat bullets, readjust the die, then crimp.
I have a nice Redding Profile crimp die but it won't work with the .433 bullets I am currently feeding the Marlin 1894. I decided that since I had already modified the Hornady seater and figure out the crimp step I would make an entire new crimp die.

I made it from 12L14 as it won't see much real wear. That steel also machines so nice that it makes everything easy.
The interior was drilled to .422. I then used a small boring bar to cut the bottom section to .434 so the bullets would easily fit. The crimp step was located and I bored the bottom section to .457 so a loaded round fit easily. I cut a slight taper on the lower 1/2 inch then beveled the opening to ensure a flared case mouth would enter.

Works just like I wanted it should.
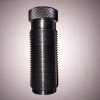
image.jpeg image.jpeg image.jpeg image.jpeg
 

Ben

Moderator
Staff member
Wow ! !

Brad, you've come a VERY LONG way with your ability to run your lathe.

That's very impressive.

Ben
 

Brad

Benevolent Overlord and site owner
Staff member
It comes from a combination of confidence and deciding that even if things don't come out just right I learn from each project.
Something like this costs me but a couple bucks and a couple hours of my time. It keeps me from doing housework too.:eek:
 

smokeywolf

Well-Known Member
Brad it's been so much fun for me to watch you progress in your knowledge of machining. And, although there is always more to learn, unfortunately, you learn too fast and a good bit of the show is over. I do however, have hopes that a knee (toolmaker's) mill is in your not-so-distant future and the show will start again.

Nice job on the crimp die. I.D.s look to have good surface finish. On the O.D. threads, did you single-point, then finish with a split die?
 

Brad

Benevolent Overlord and site owner
Staff member
I single pointed the threads then used a hex die to finish. I have skipped the hex die but sometimes end up with threads a bit snug in the press. I think I need to slightly reshape my threading tool. I think it is a bit over 60° and that is the issue.

A mill is in the future. Just so many things a mill is needed to make.

This has been a great learning experience. I have mostly learned to think the order of processes over as doing things in the right order is the single most important thing. Learned that the hard way!
 

Pistolero

Well-Known Member
Looks great, well done. Not having a 7/8-14 die, I will just live with what I cut. :eek:

Speaking of mills---

Have you ever seen a Benchmaster mini knee mill? Nice little machine for small projects.

img4.gif

Mine doesn't have the horizontal power feed on the left side that this one has. Nice little machine. Mine
is such a cluttered mess that I'd rather not show pix at this time, buried aluminum chips.

Latest was putting LED lighting on the Benchmaster mini-mill. Got one of these...
http://www.ebay.com/itm/US-5M-RGB-L...250296?hash=item5b118989b8:g:8hQAAOSwBLlVWt5q

A few 12v wall warts for $3 each, shipped to my door, and made an aluminum angle support from 0.032 sheet 4" long with a pair of 1mm LED strips,
two of these assemblies stuck under the pulley guard gives 24 0.2 watt LEDs, or 4.8 watts shining on the cutter area. Works well, nice uniform light
from 24 separate LEDs in two 1"x4" arrays. Soldering to the tiny strips is a bit fussy, though. 24 ga stranded wire is too big!


Bill
 
Last edited:

smokeywolf

Well-Known Member
I painted myself into a corner a few times.

One thing that sometimes causes a little galling or binding is not knocking the points off the peaks of your threads. Also, I always polish the threads a little with a big piece of scotch-brite.
 

Brad

Benevolent Overlord and site owner
Staff member
I painted myself into a corner a few times.

One thing that sometimes causes a little galling or binding is not knocking the points off the peaks of your threads. Also, I always polish the threads a little with a big piece of scotch-brite.

I tend to always chase the threads with a triangular file the. Follow with some 400 emery folded over the same file. Seems to clear the little chips and burrs up.

I have found that getting cute and cutting the major diameter large doesn't work well for me. For 7/8-14 I tried cutting to .875 the threading. I do better when I start at .872 or even .870 then thread.

I may look at getting some corse scotch-Brite for knocking off the peaks.

Good tip, I will give it a shot.
 

smokeywolf

Well-Known Member
Bill, that looks like sturdy little piece of equipment. Looks more like a semi commercial machine and resembles some of the stuff produced by Walker or Warner Swasey. Reminds me of a little mill we had in the MGM shop. It actually started out life in the early 1900s as a Hardinge Cataract horizontal mill. Somebody had at some point in the mid 1900s replaced the Hardinge head with a very small Bridgeport head and turned it into a vertical mill.
 

Pistolero

Well-Known Member
Thanks, smokeywolf - this keeps the Hurco from being as urgent as it would be
otherwise.

Actually, it can be small, and no quill means drilling isn't really sensible, and not enough overhead for
long bit anyway. Fine for small work, and I have been learning a lot with it, and making useful stuff.
I have a FEG Hi Power that I plan on putting a dovetail front sight on, will be my first dovetail, unless
I practice on a piece of aluminum rod, which seems prudent. $800 with a lot of tooling, dividing head,
etc, it seemed a bargain.

Brad,
That looks like quite a machine. Get the hold down set with it, and the R8 collets, you will
need them immediately, although a lot of work can be held in the vise. DRO makes milling
a lot better, no doubt. I don't miss it anywhere near as much on the lathe. Counting turns
and finding edges all the time slows you down a LOT, but you can do fairly well, but IME
(very limited!) I just cannot hold the tolerances without the DRO that I can with. Not as hard
on the lathe, by comparison.

I do take a flat, fine cut file and take the sharp tops off of the threads when I am done,
then wire brush as it spins to knock off burs and such.

Bill
 
Last edited:

smokeywolf

Well-Known Member
Although the PM machinery is among the better quality Chinese/Taiwanese machine tools, I just can't picture you being happy with anything but a a Bridgeport or Bridgeport clone. The best of the Bridgeport clones by the way, is the WEBB Champ.

I just spent about an hour shopping mills & lathes and discovered that the resale values of both my early '80s WEBB lathe and my '85 Bridgeport mill have each increased by about $1,000 in the past 2 years.
 

Pistolero

Well-Known Member
The Bridgeport I borrow was originally the spare machine for a small shop who bought two in 1969, putting one in the corner under plastic
and never using it while using the other. My friend bought it about 15 yrs ago, basically NOS, mint condition and added the DRO
to it. REALLY nice machine!

So what is a decent Bridgeport worth these days?

Bill
 

smokeywolf

Well-Known Member
Depends on the year made. But, if your friend has a '69, which is the traditional V-belt & pulley arrangement for spindle speed changes (not that inconvenient by the way). Ways have little to no wear (less than 2,000 hrs.). Newell, Accu-Rite or Mitutoyo DRO. No shaper attachment on back end of ram. No tooling. No power feed on X or Y axis. Assume 9 X 48 table. Pristine condition. Without seeing it, between $6500 and $8000. With collets, Kurt vise and feed on X axis, maybe a little more.

My '85 with variable speed head, feed on X, original tooling package, which included point-of-operation guards, clamp kit, Kurt vise, collets, collet rack, rotary table w/right angle attachment. About 5,000 hrs on the mill itself. Plus, Mitutoyo DRO on X and Y. Separate DRO on quill. All original paperwork from RFQ to PO. About $9,000-$10,000.
If I added the additional Kurt vise, spin-index fixture, another rotary table, indexing head, 2 ratcheting collet indexers, 2 dividing heads, right angle spindle attachment w/2 arbors, spacers, back end support, and about 400 to 500 end mills you could probably double that.
 

Brad

Benevolent Overlord and site owner
Staff member
Those may well be out of my price range. I figure I can get the wife to let me spend 4-5 K total before I get shot.
I figure that a mill is gonna need close to a grand in tooling in short order also, that figures in to my calculations too.
 

Pistolero

Well-Known Member
My friend's Bridgeport has the variable speed, Kurt vise, all the stuff you mentioned, AccuRite DRO, pretty much anything
I can even think of. His first mill, a Jet, got him started and then he moved up to the Bridgeport and replaced his
South Bend Heavy 10 with the Hardinge. I used to think the SB Heavy 10 was a REALLY nice lathe......seems almost like a
tinker toy now compared to my Sheldon 11x56 or the Hardinge (how can we get reverb font? Seems like you should
have that when you type "Hardinge") :rolleyes:

Brad - I think you will get a lot of good out of that mill. What you are doing on the lathe shows
that you don't let anything slow you down, and you will come up to speed on the mill pretty
quickly.

Smokeywolf - all the mills I have ever used have been knee mills, is a fixed table/movable head a significant
disadvantage or is there an advantage to that style?
 
Last edited:

smokeywolf

Well-Known Member
Bill, I've never seen a mill with a fixed table. Knee mills, universals and horizontals all have tables which move on at least the X, Y and Z axis. There are even a few mills out there that have tables that rotate on the X axis.

Knee mills, also known as a "toolmaker's mill" have a little less rigidity than a universal or horizontal mills. That means finishes aren't quite as good, repetitive accuracy of cut is not quite as good, longevity is often not quite as good. Universals can be set up for horizontal milling in a minute or two; not so a toolmaker's mill.
CPGate.jpg The heat-sink in the pic I machined the fins on a Van Norman Universal. It would have been a pain in the rear to try to do it on a toolmaker's mill.