
You are using an out of date browser. It may not display this or other websites correctly.
You should upgrade or use an alternative browser.
You should upgrade or use an alternative browser.
Tip of the day
- Thread starter Snakeoil
- Start date
Loaded Lee turrets fit nicely in the small, plastic Folger's coffee containers, along with a dedicated shellholder and a couple of "dummy" cartridges and even a cartridge checker if you like. All you need is a shelf for the containers. I like the containers because they keep the dust off of the dies.
I like your idea, but all my small Folger's cans are full of bullets!
I need to do a conversion and go to all see-through containers for those, like @CWLONGSHOT uses though.
My source dried up.LoL! My biggest problem was getting the wife to spend the extra money on the small containers for a while until I got what I needed.
I drink a different coffee, but worked with a guy who plowed through all sizes/colors of plastic coffee cans. Haven't seen him in ten years and now. so I'm running low on coffee cans.
Rockydoc
Well-Known Member
I like your having “¼ round” moulding on the edge of the table top to keep things from rolling off.For members who has an RCBS JR 2 or JR 3 press and have devised clever methods of keeping its handle in the up position, here is the simple fix. Located on one side of the toggle block, and between it and the press frame, is what RCBS calls a "bow washer". It's a very thin spring steel washer and if you've never stripped the press you may not know of it.
1. Remove the "C" clip from one side of the toggle pin and remove it, being careful to prevent the toggle block and ram from falling clear of the press. Don't loose the washer!
2a. Using the method of your choice, add more "bow" to the washer, and reassemble.
2b. Call or e-mail RCBS and ask to purchase a JR's bow washer. If you've been round the RCBS block, you know you cannot buy one, but, nonetheless, one will magically appear.
3. Clean, lube and reassemble.
View attachment 28634
Bret4207
At the casting bench in the sky. RIP Bret.
You'd go crazy in my shop then and I'd likely be afraid to touch anything in yours! Different strokes!Can't stand clutter (or noise) in my work area, so I try to clean and organize, return tools to where they belong as I go. Doesn't always work out and I end up with twenty tools from twenty different locations and barely finish in time to move on to some other priority.
Glaciers
Alaska Land of the Midnight Sun
I remember Mr. Bret posting a picture of his shop. It looked like a combination of an antique/flea market, garage, outbuilding, storage shed for cool useful tools and stuff that’s are no longer needed kinda place. You know, where if you can’t reach it from the garage door, which won’t close because of the overflow, then try the side or back door. Failing that there was a window over what looked like a work bench which looked like you could pry open with the crowbar you found at the side door.
I do remember a horse collar hanging from the beach vice. Can’t remember exactly. The picture had to be taken with a telephoto lens from the opposite side through a window.
It was certainly an impressive array useful inaccessible stuff.
I do remember a horse collar hanging from the beach vice. Can’t remember exactly. The picture had to be taken with a telephoto lens from the opposite side through a window.
It was certainly an impressive array useful inaccessible stuff.
Glaciers
Alaska Land of the Midnight Sun
Forgot to add the quote to my above postYou'd go crazy in my shop then and I'd likely be afraid to touch anything in yours! Different strokes!
Bret4207
At the casting bench in the sky. RIP Bret.
You're far too kind...I remember Mr. Bret posting a picture of his shop. It looked like a combination of an antique/flea market, garage, outbuilding, storage shed for cool useful tools and stuff that’s are no longer needed kinda place. You know, where if you can’t reach it from the garage door, which won’t close because of the overflow, then try the side or back door. Failing that there was a window over what looked like a work bench which looked like you could pry open with the crowbar you found at the side door.
I do remember a horse collar hanging from the beach vice. Can’t remember exactly. The picture had to be taken with a telephoto lens from the opposite side through a window.
It was certainly an impressive array useful inaccessible stuff.
")
glassparman
"OK, OK, I'm going as fast as I don't want to go!"
But don't use your garage/shop to test your old powder for long term storage flammability.Have enough primers to burn all your powder .
Don't ask me how I know.
Mike
Attachments

Snakeoil
Well-Known Member
Oooh... fugly. Sorry to hear that happened to you. The rifle against the wall is a sad sight. That looks like a vintage car in there as well.But don't use your garage/shop to test your old powder for long term storage flammability.
Don't ask me how I know.
Mike

Snakeoil
Well-Known Member
While I was casting today, I thought that maybe some of the things I've done or made to make casting easier might be of interest to the group.
NOE large mould sprue plate grabber
Have not come up with a better name for this gizmo. This is intended for 4 and 5-cavity moulds where breaking the sprues is difficult by hand. But it would also be handy for even 2 and 3-cavity moulds for those with arthritis or other issues that won't them them cut the sprues with a gloved hand.
The grabber mounts to the benchtop, someplace convenient to where you are when you cast. Here is the grabber mounted to my bench. You can just see the base of my RCBS furnace in the upper left corner of the photo.

The idea is to cast the bullets then withdraw the mould from under the furnace and rest it in the grabber. When the last sprue frosts over, you simple push the mould hands to the left, cutting all the sprues quickly and easily. Here are the two steps.


I offered the design to NOE. Never heard back from them. If they ever offer it for sale, now you know where the idea came from. Yeah, I know, no sprues in the photos. I was done casting when I took the picks.
Mould Rest Roller
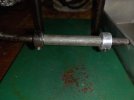
Anyone that uses aluminum moulds knows that sliding the mold over the round steel rod that serves as a rest under the RCBS furnaces is akin to dragging your fingernails down a blackboard. Aluminum is a far stretch from a glide metal. So, I had a short piece of steel hydrauic brake tubing in the scrap metal box that fit the rod perfectly. I machined another collar (you can buy them in hardware stores) from aluminum, slid the tubing on and then the other collar. Left a little room so the tubing would not bind. Now, the mould rolls effortlessly over the rest and there is no more gaulling of the bottom of the mould.
Here's the furnace showing the mould rest.

Here is a close-up showing the steel tubing roller. I would think that faucet or toilet feed pipe tubing would work as well.
I have another idea to improve the mould rest but have not made it yet. Might be tomorrow's therapy project.
Making Cardboard Wads
Charlie had suggested I use a thin wad behind the plain base bullet in my .38-55 when using 2400 smokeless powder. He said the Schuetzen guys use them as "gas checks". So, I thought I'd make a punch to produce correctly sized wads. What better to use to make the right size than the case it will be used with.
I took a damaged case and sharpened the neck. Then turned it around in the lathe and machined the rim flush with the OD of the case. I then drilled the primer hole out so I could put a rod into the case to push the wads out.
With the rim machined flush, the case will fit in the drill chuck of my drill press. Put the case in so it bottoms out in the chuck. Put a piece of wood on the table and clamp it. You need to clamp it because the punch will make a cut in the wood and make for cleaner cuts on the wads. I ran the drill at 1325 RPM which was just about perfect. Cut a new wad quickly and did not generate too much heat.
Here is the punch.


You have to move the wood base to a new position every so often because the cut in the wood gets too deep and pushes the wads too deep into the punch body. You can punch no more than 10 wads before you have to remove the punch and push out the wads. But the process goes pretty quickly. Here's a box of wads I made in a few minutes from some old tablet back carboard I had saved. I put them in a case and they stayed put. I had to blow them out by blowing thru the primer hole. I'm thinking of breach seating my High Wall so the case with have florist foam to keep the powder in place and this card wad over the foam to serve as the gas check.

NOE large mould sprue plate grabber
Have not come up with a better name for this gizmo. This is intended for 4 and 5-cavity moulds where breaking the sprues is difficult by hand. But it would also be handy for even 2 and 3-cavity moulds for those with arthritis or other issues that won't them them cut the sprues with a gloved hand.
The grabber mounts to the benchtop, someplace convenient to where you are when you cast. Here is the grabber mounted to my bench. You can just see the base of my RCBS furnace in the upper left corner of the photo.
The idea is to cast the bullets then withdraw the mould from under the furnace and rest it in the grabber. When the last sprue frosts over, you simple push the mould hands to the left, cutting all the sprues quickly and easily. Here are the two steps.
I offered the design to NOE. Never heard back from them. If they ever offer it for sale, now you know where the idea came from. Yeah, I know, no sprues in the photos. I was done casting when I took the picks.
Mould Rest Roller
Anyone that uses aluminum moulds knows that sliding the mold over the round steel rod that serves as a rest under the RCBS furnaces is akin to dragging your fingernails down a blackboard. Aluminum is a far stretch from a glide metal. So, I had a short piece of steel hydrauic brake tubing in the scrap metal box that fit the rod perfectly. I machined another collar (you can buy them in hardware stores) from aluminum, slid the tubing on and then the other collar. Left a little room so the tubing would not bind. Now, the mould rolls effortlessly over the rest and there is no more gaulling of the bottom of the mould.
Here's the furnace showing the mould rest.
Here is a close-up showing the steel tubing roller. I would think that faucet or toilet feed pipe tubing would work as well.
I have another idea to improve the mould rest but have not made it yet. Might be tomorrow's therapy project.
Making Cardboard Wads
Charlie had suggested I use a thin wad behind the plain base bullet in my .38-55 when using 2400 smokeless powder. He said the Schuetzen guys use them as "gas checks". So, I thought I'd make a punch to produce correctly sized wads. What better to use to make the right size than the case it will be used with.
I took a damaged case and sharpened the neck. Then turned it around in the lathe and machined the rim flush with the OD of the case. I then drilled the primer hole out so I could put a rod into the case to push the wads out.
With the rim machined flush, the case will fit in the drill chuck of my drill press. Put the case in so it bottoms out in the chuck. Put a piece of wood on the table and clamp it. You need to clamp it because the punch will make a cut in the wood and make for cleaner cuts on the wads. I ran the drill at 1325 RPM which was just about perfect. Cut a new wad quickly and did not generate too much heat.
Here is the punch.
You have to move the wood base to a new position every so often because the cut in the wood gets too deep and pushes the wads too deep into the punch body. You can punch no more than 10 wads before you have to remove the punch and push out the wads. But the process goes pretty quickly. Here's a box of wads I made in a few minutes from some old tablet back carboard I had saved. I put them in a case and they stayed put. I had to blow them out by blowing thru the primer hole. I'm thinking of breach seating my High Wall so the case with have florist foam to keep the powder in place and this card wad over the foam to serve as the gas check.
Attachments
Last edited:
Ian
Notorious member
Card wads to protect the bullet base, we've come full circle! Now the big question- do you think they work?
They work. So do paper gas checks stamped from manilla folders, formed with a top punch and lube die with gas check seater stop installed on a Lyman lubrisizer and held on the bullet base with a little smear of bullet lube. Good for about another 200 fps with accuracy in .30-caliber than plain-based, very cheap, and very consistent shooting. I used wads punched from soda boxes to vastly improve the plain-based accuracy of bullets in my .45 Colt NEF rifle and also use them in my 45/90 smokeless loads.
Snakeoil
Well-Known Member
Not full circle for me. This will be a first with a wad. Ian's experience says I am on the right path. A firing line of Schuetzen guys is another vote of confidence. I enjoying the learning experience, be it a positive or negative outcome. It's all knowledge, right?Card wads to protect the bullet base, we've come full circle! Now the big question- do you think they work?
Last edited:
Speaking of wads,...
Do NOT use wool felt wads over large charges of magnum smokeless powders!
I had some, which someone gave me to use in my Old Army, but I didn't use wads and my loads were fine, meaning not to be messed with.
I had 500 HARD commercial cast 265 grain 44 bullets which leaded in my OM SBH, but I didn't want to waste the wads or the bullets, so I tried them. Over as much WC820 as would fit with the wad in place and the bullet seated to the crimp groove, the thump of the recoil was gratifying and the low "BOOM" of the report was comforting. Accuracy was uncanny and NO leading.
The cloud of putrid smoke was endearing as well, like I was shooting black powder, until it wafted back to envelop me in an unnatural odor I can't even describe - well-aged, fermented toe cheese, smoldering in a compacted poop-infused hair-fire, maybe? I thought I was manly enough to suck it up and finish fifty of them, but after a cylinder-full, I pulled the rest - and I use an inertia puller, which isn't fun, but it was more fun than steeping myself in that foul odor.